Author: PK
-

Moosey’s Sunny Tommies
Ben’s better half is a gardener and cook in her own right. This is her first post on the blog. Thanks and welcome to Moosey.
She writes:
Ever have the problem of too many tomatoes? Sick of Bruschetta but don’t want to let your hard grown fruit go to waste? “sun drying” tomatoes is a great way of storing excess fruit for a later date.
Steps:
Firstly, collect as many tomatoes as possible. We don’t let any, including fallen ones, go to waste. Of course, any with rot, disease or pest should go into the compost. For this recipe, the riper the tomatoes the better.
Wash tomatoes in a light vinegar solution to get rid of any nasties, and then let them dry. Larger tomatoes are sliced or halved, and smaller and cherry tomatoes just slit to allow the juice to escape. You may also wish to core larger tomatoes.
Gently squeeze the majority of the juice and seeds out. This is to help the drying process, and will speed it up. Once done, lay your tomatoes out in your dehydrator, sprinkle with salt and turn leave until they are nice and dry. Ours took ~36 hours because there was quite a few (and we forgot about them). Dried tomatoes will be reduced in size, shrivelled and leathery, but not tacky
Sterilise a jar (or jars) by boiling in water, and once dry fill tightly with your tomatoes. Now, add some flavour. I suggest garlic, thyme, oregano (all home grown of course) but really it’s up to you. Cover with a good olive oil, and pop into the fridge. Leave for a while, and enjoy on your next home made pizza, or as a snack during the day.
Kate Moosey

Related Links:
Please consider subscribing to get a weekly email summary of our posts.
[mc4wp_form id=”15771″]
Written by
·
-
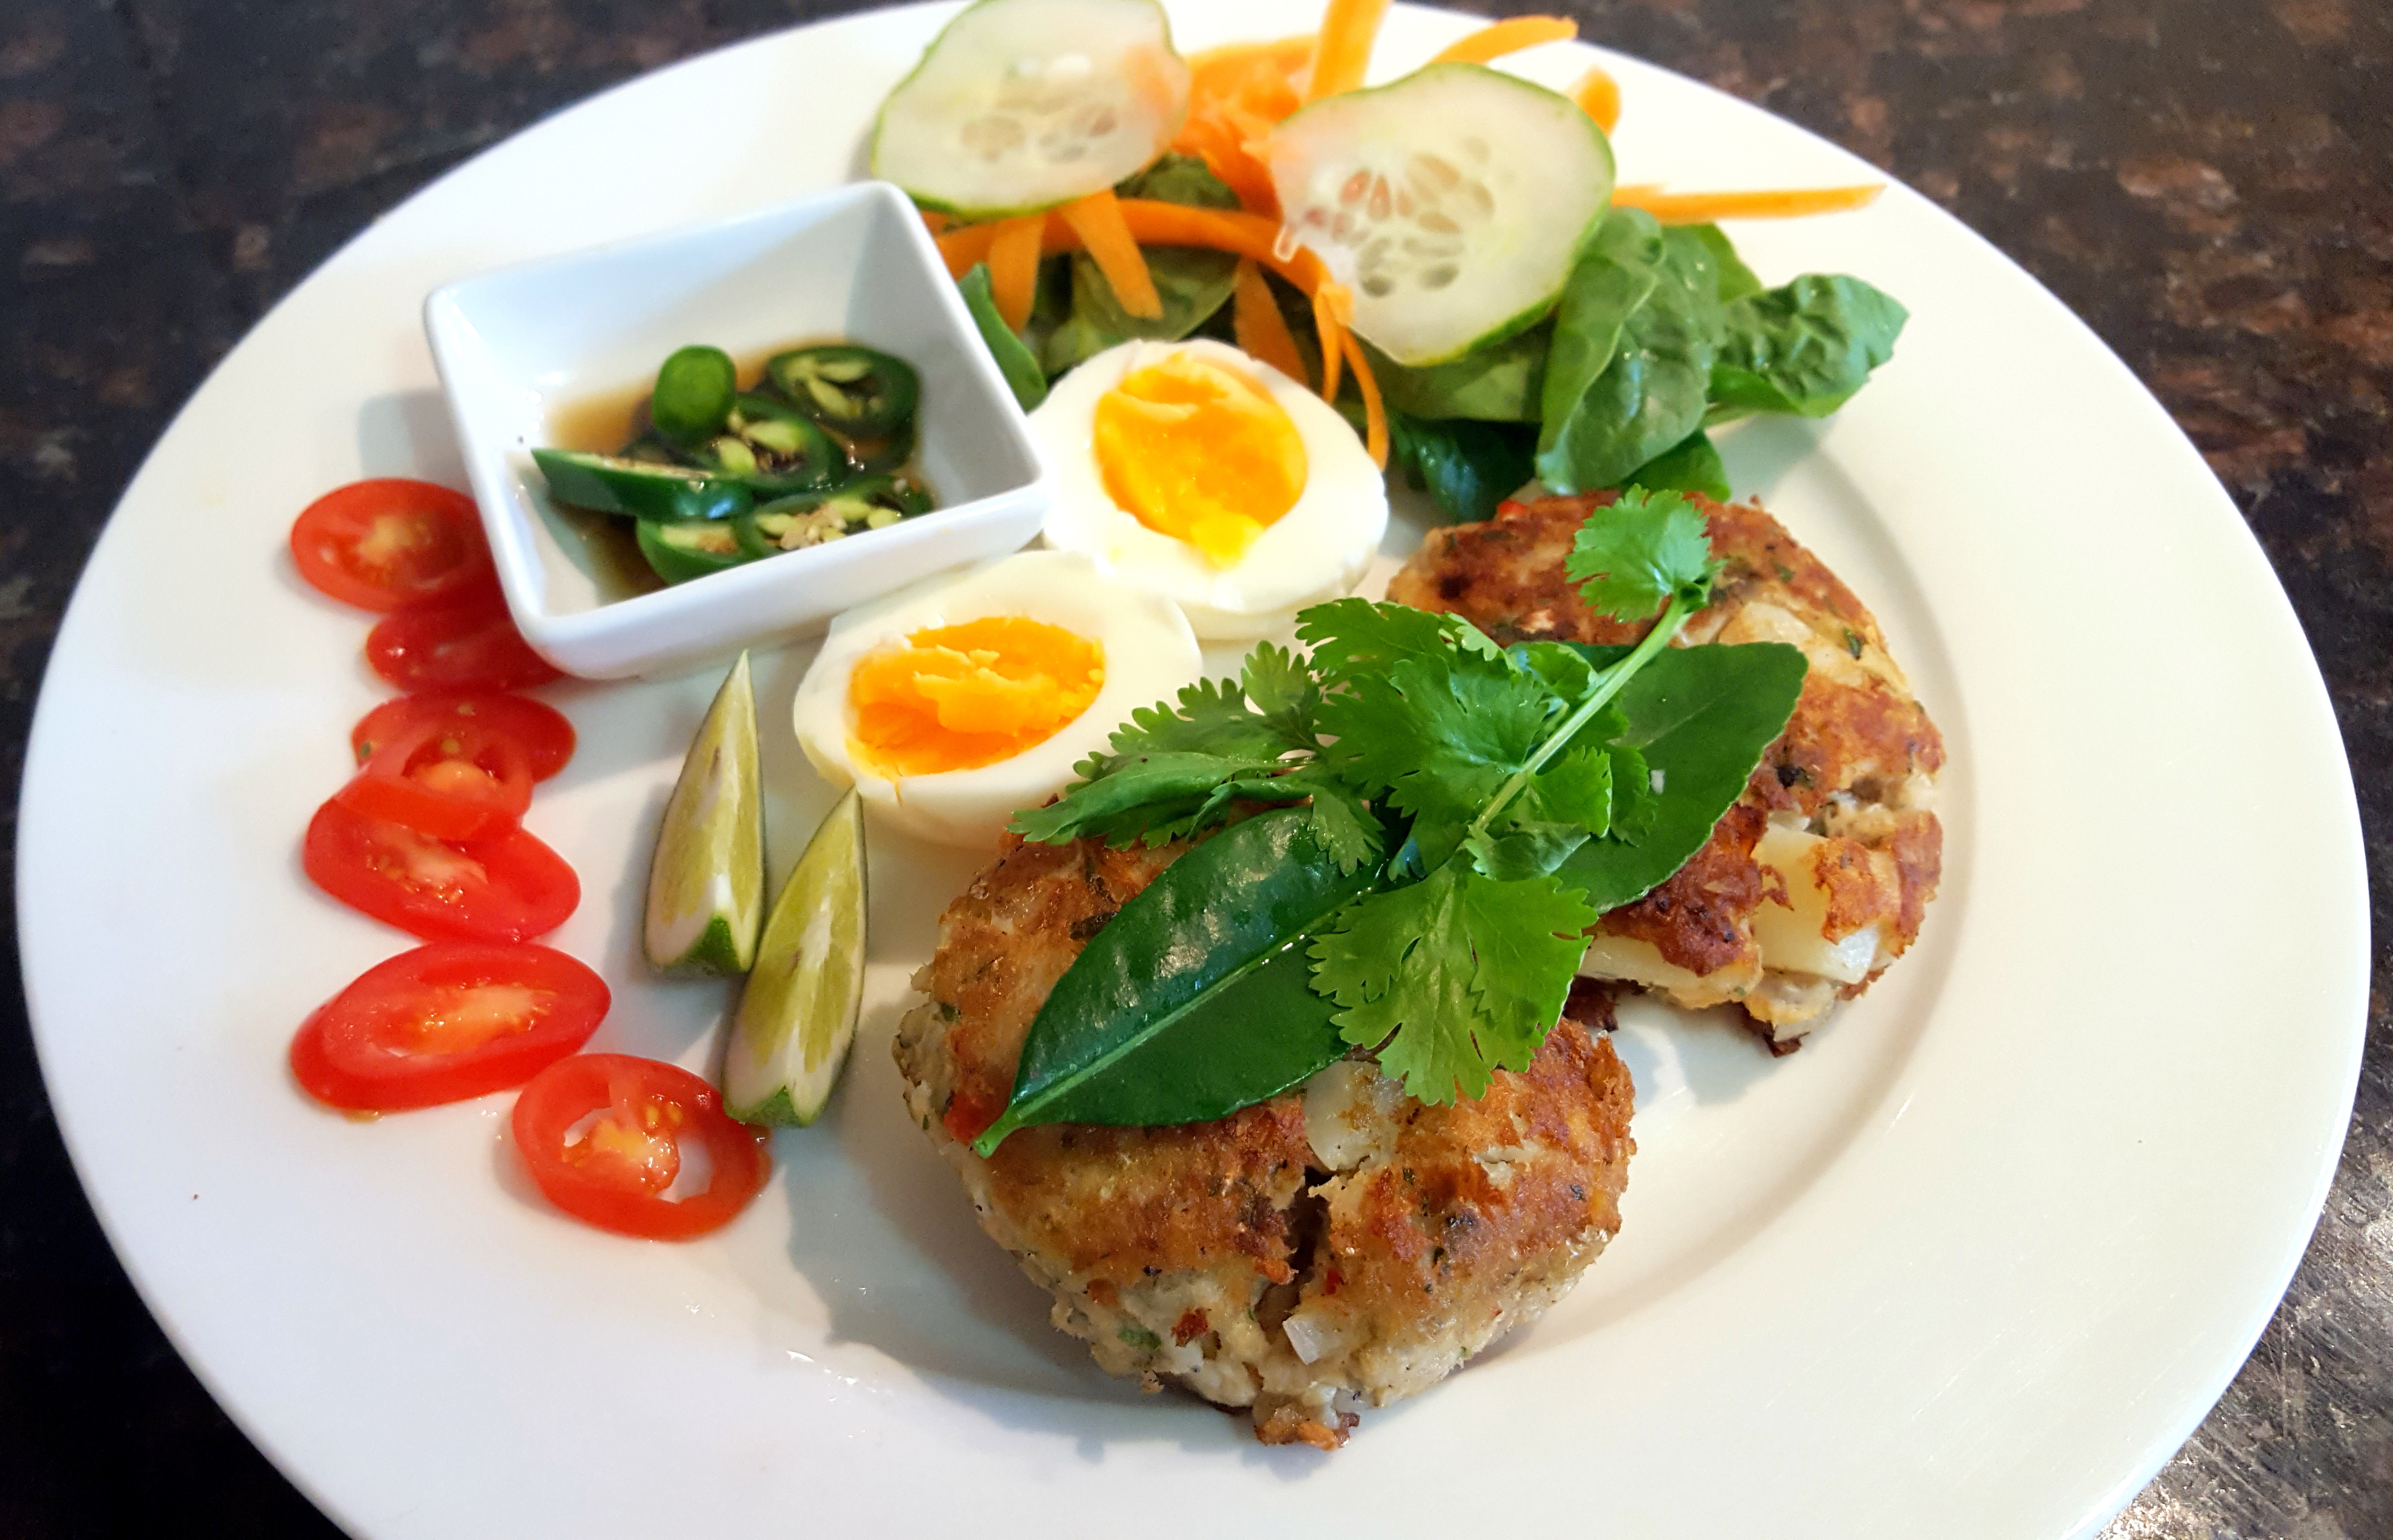
PK’s NoRecipe Thai Fish Cakes
Fish cakes taste great and are an amazing way of making a little bit of fish go further. They were a staple growing up and one of the dishes my mum cooked us that will always stay with me :).
I never use a recipe and no two batches come out the same and that is half the fun. Below I am doing a take on Thai fish cakes but I am just as likely to make them coated in breadcrumbs. Sometimes I keep the potatoes chunky, sometimes I mash everything well to give a smoother texture.
I just follow two basic rules in that I use a 1:1 ratio of fish to parboiled potatoes and I like to add colour by using finely minced fresh vegetables in the mix itself. If you find the cakes fall apart during cooking, try a bit more egg in the mix next time.
Parboil the potatoes:

Mash your fish (I am using canned John West Pink Salmon):

Prepare the vegetables (I am going for a Thai taste so I am using lime zest, shallots, coriander, garlic and some red capsicum for colour):

Whisk an egg or two and mix everything up (I did this gently as I wanted a chunky look):
Make small or large cakes, using your hands, as you please and then pop them in the fridge for a bit (just look at the colours, beautiful):

A quick shallow fry is all that is needed:

Serve with some greens and you favourite sides:

Enjoy,
PK
Written by
·
-
PK’s Easy Thai Fish Cakes
Fish cakes taste great and are an amazing way of making a little bit of fish go further. They were a staple growing up and one of the dishes, my mum cooked us, that will always stay with me :).

I never use a recipe and no two batches come out the same but that is half the fun.
Below I am doing a take on Thai fish cakes but I am just as likely to make them coated in breadcrumbs. Sometimes I keep the potatoes chunky, sometimes I mash everything well to give a smoother texture.
I just follow two basic rules in that I use a 1:1 ratio of fish to parboiled potatoes and I like to add colour by using finely minced fresh vegetables in the mix itself. If you find the cakes fall apart during cooking, try a bit more egg in the mix next time.
Parboil the potatoes:

Mash your fish (I am using canned John West Pink Salmon):

Prepare the vegetables (I am going for a Thai taste so I am using lime zest, shallots, coriander, garlic and some red capsicum for colour):

Whisk an egg or two and mix everything up (I did this gently as I wanted a chunky look):
Make small or large cakes, using your hands, as you please and then pop them in the fridge for a bit (just look at the colours, beautiful):

A quick shallow fry is all that is needed:

Serve with some greens and you favourite sides:

Enjoy,
PK
YOU MIGHT ALSO LIKE
THAI CUISINE
SOUTH EAST ASIAN FOOD
MORE POTATO DISHES
MORE NORECIPE GOODNESS
Please consider subscribing to a weekly email summary of our posts or check us out on Facebook @growitcatchitcookit.
[mc4wp_form id=”15771″]
Written by
·
-
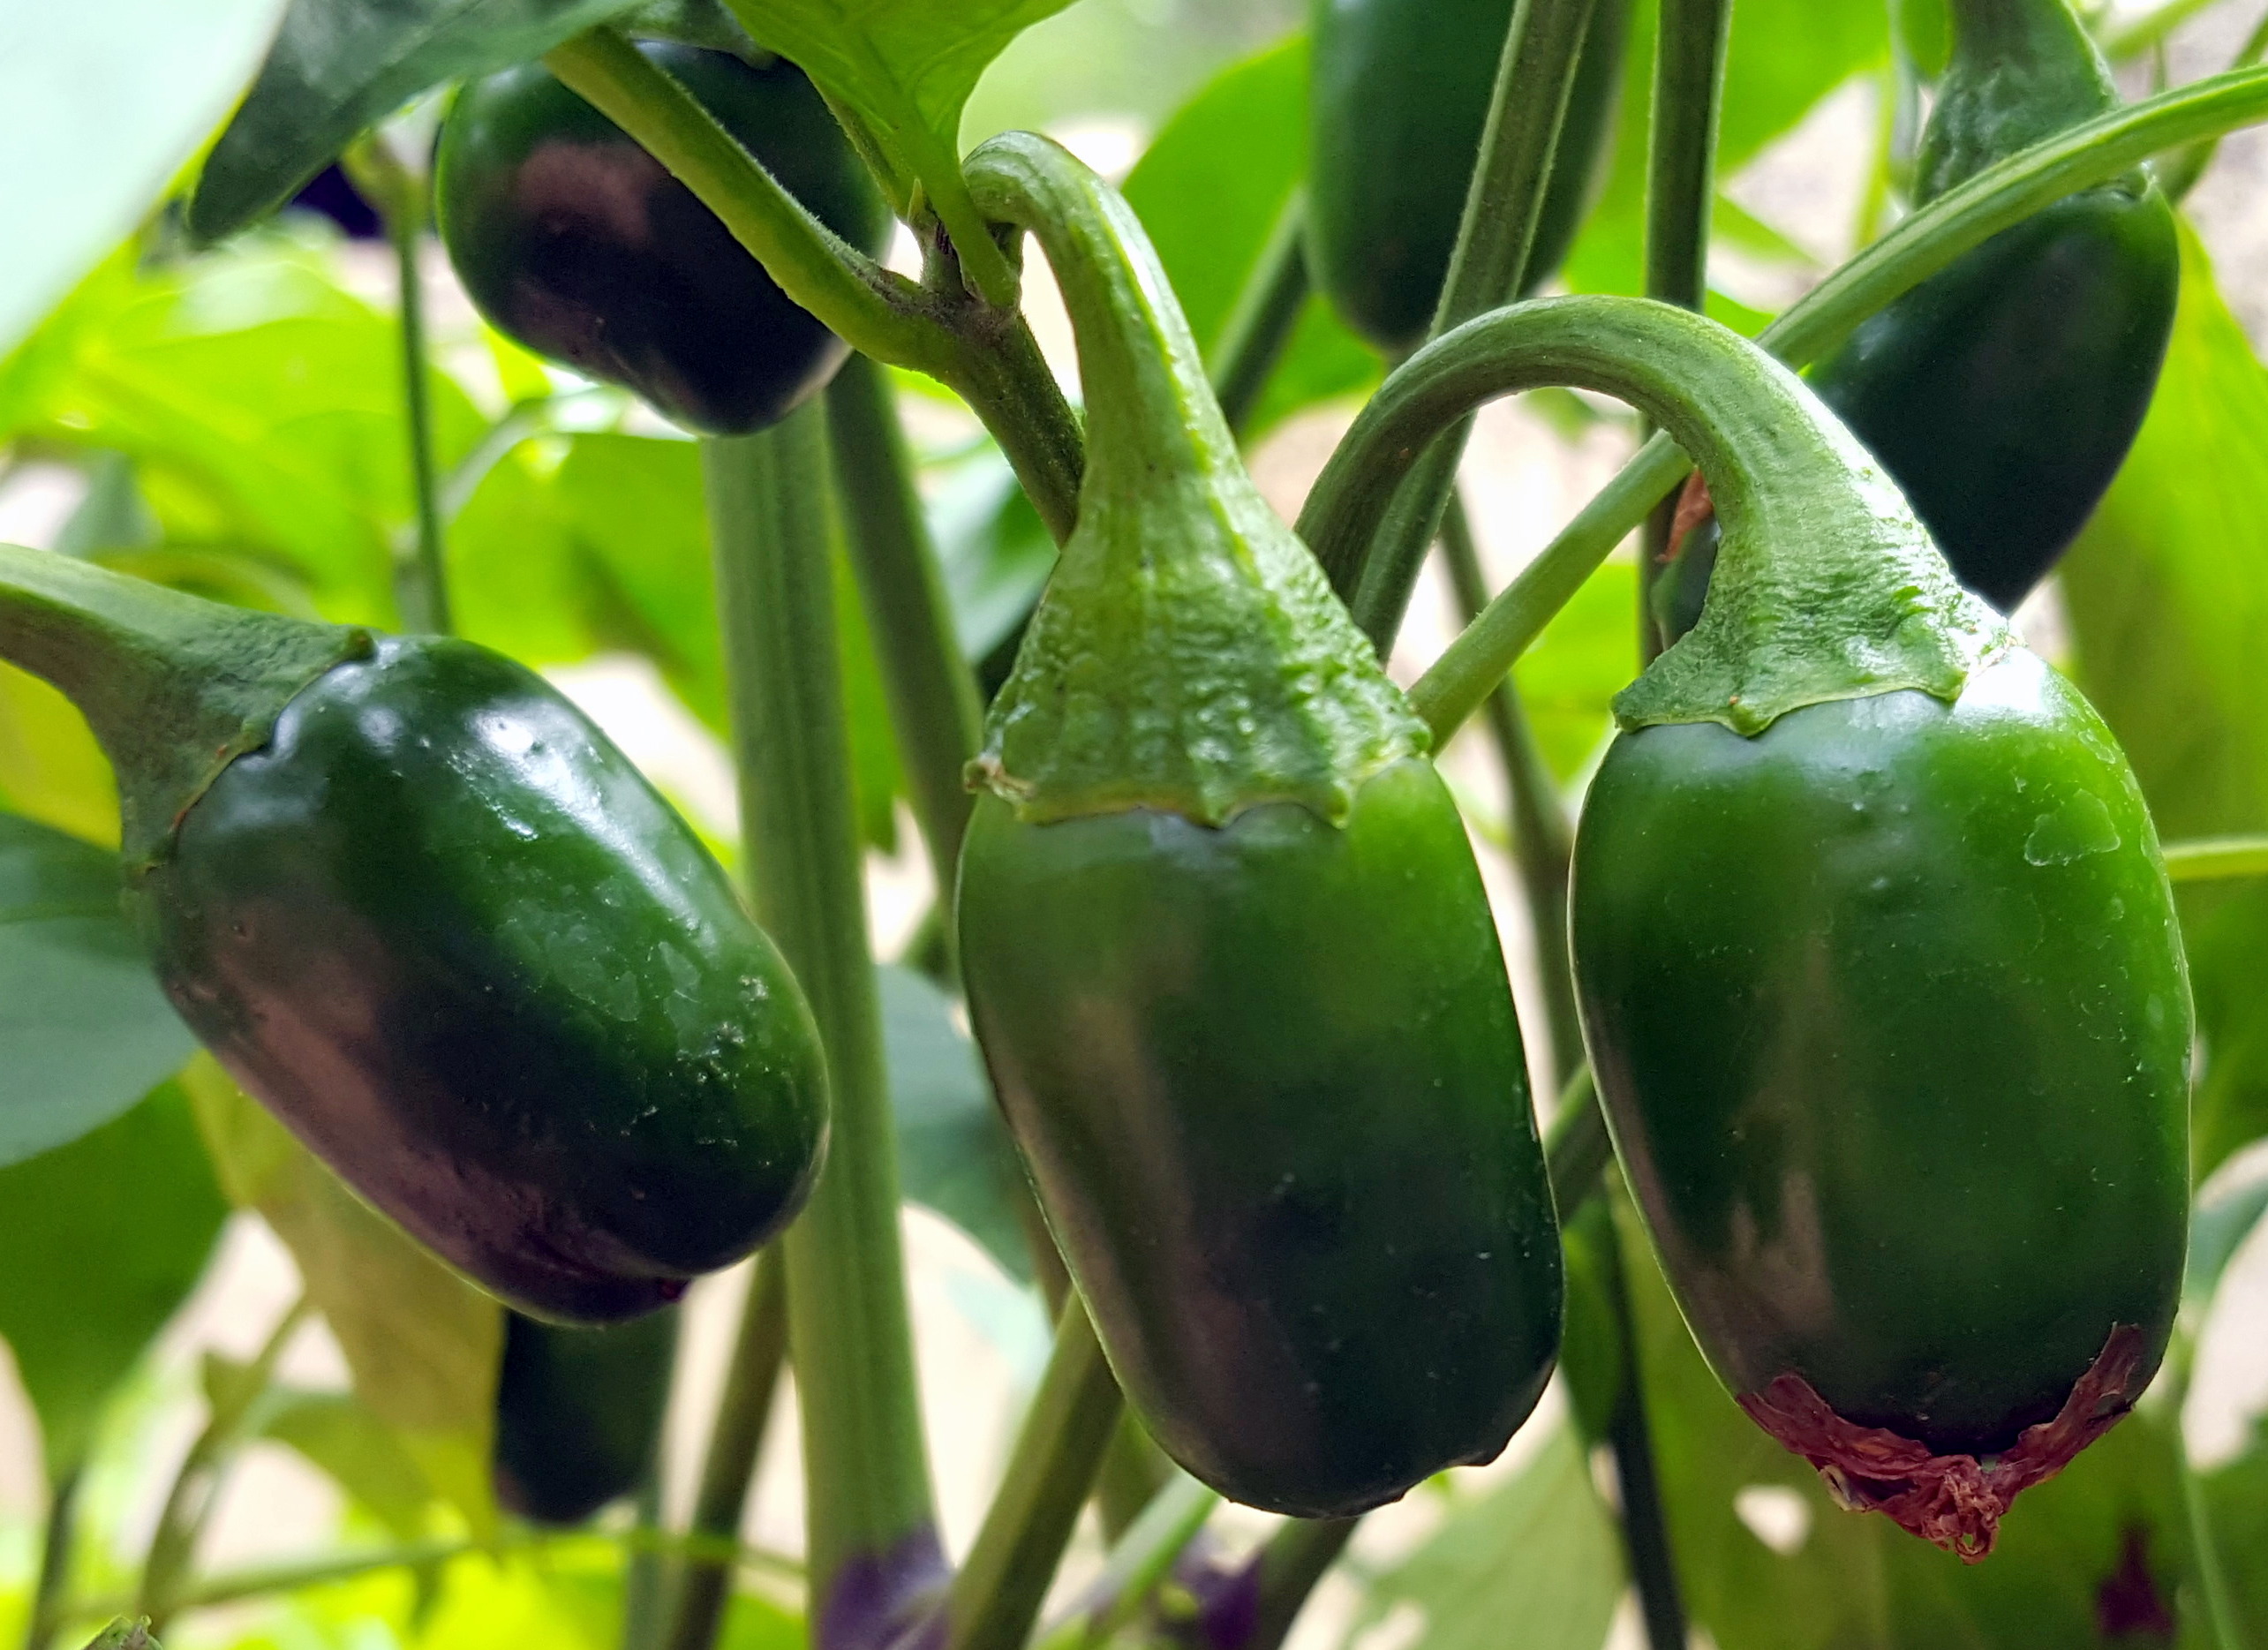
Chili Pepper: Jalapeño
This is the chili I automatically think of whenever some says, well, ‘chili’. It is middle of the road when it comes to heat and is very flavoursome.
You can do so much with it from using it raw, pickled, cooked and dried. If you prefer flavour over the heat factor, take the seeds out prior to using it. If you reserve your seeds you will have lots of luck propagating them.
It is very easy to grow during summer if it gets regular watering but it does not like the cooler months. Irregular or over watering, especially if the fruit gets wet, leads to rust and other diseases.
You can buy seeds in Western Australia from http://wacse.org/product/jalapeno/
Flower:

Fruit:

Plant:

Here you see them sliced and the seeds exposed:

One serving suggestion (sliced with fish sauce):

Fruiting Months:
- November
- December – gangbusters
- January
- February
- March
Position/Care:
Full scorching hot Perth sun but you must keep them well watered and make it regular. Haphazard watering will lead to fruit drop. Very subject to fungal diseases of the leave.
Standard liquid vegetable fertilser often and additional potassium during the summer fruiting months.
Jobs:
Power feed then prune heavily in April to help them survive the cooler months.
Here is the resulting regrowth late July of a good pruning in April:

Scale:

GICICI Grown Plants
[table id=chilis /]
Related Links:
- FoodHacks: Jalapeno Chili Powder
- see more jalapeno posts here
- see more posts about growing chilis here
- see more cooking with chili posts here
- go to all meal ingredients here
- go the Grow It Perth calendar
- see a work in progress map of edible plant species here
Written by
·
-

KT’s NoRecipe Chorizo, Chicken and Potato Roast
KT found the original recipe for this on one of the best blogs on the internet, Baby Mac. It has become one of our staple meals and to this end she simplified it as much as possible.
It scales really well because you simply whack your desired amounts of chicken thighs, chopped chorizo sausage and quartered potatoes into a non-stick pan. Season with some Italian herbs, pepper and maybe some sliced chilis.

Whack them in the oven on say 200°C until they look like this.

Then serve with a salad and even the kids will like it :).

Yum, thanks KT!
YOU MIGHT ALSO LIKE
ITALIAN CUISINE
MORE KID FRIENDLY MEALS
MORE POTATO DISHES
MORE NORECIPE GOODNESS
Please consider subscribing to a weekly email summary of our posts or check us out on Facebook @growitcatchitcookit.
[mc4wp_form id=”15771″]
Written by
·
-

PK Makes Rick Stein’s Chettinad Chicken
This is by far my favourite recipe from the TV series and book, ‘Rick Stein’s India’ (see BBC link here).
In my family’s version we keep the heat factor low and serve it with lightly steamed vegetables to keep it kid friendly. Well that is what my wife (who hates chili and curries in general) tells everyone but you didn’t hear it from me. Also in my defence, she shouldn’t have bought me a book full of curry recipes :).

Despite the shameful lack of chili and heat, our version of this dish is still amazingly dry, peppery and oh so flavoursome. I think it loses some of the colour that so defines these type of curries however. I hope I am forgiven though as the result is very tender, sticky chicken calling out for some rice and sides of your favourite green vegetables :). Edit: I now use ground annato seed to impart a natural red colouring but one without the heat of chillis.
A couple of recipe notes:
- This dish calls for the use of a lichen called dagarful and I beg you to try it. I used cinnamon as a substitute originally but I have used the real deal in this post and there is no going back.
- I use my home-made chicken stock instead of water.
- Please check out my masla making tips in PK’s Curry Paste Kit before you start.
You will be:
- Making the dry masala.
- Cooking the chicken.
- Serving.
You will need:
- Ingredients:
- Dry Masala
- 1 Tbsp fennel seeds
- 1 Tbsp cumin seeds
- 1 Tbsp coriander seeds
- 1 Tbsp black peppercorns
- 1 tsp kashmiri chili powder (go 1 Tbsp or more if allowed)
- Chicken
- 1kg skinless boneless chicken thighs, chunky sliced, short ways
- 200g red shallots, diced
- 200ml home made chicken stock
- 50ml olive oil
- 1 tsp fennel seeds
- 8cm cinnamon stick
- 1 Tbsp dagarful, rinsed and rough chopped (or an extra 3cm cinnamon stick)
- a very large handful of curry leaves (the more the better)
- 4 garlic cloves, peeled and crushed
- 4cm ginger, peeled and grated
- 1 tsp raw sugar
- 1 tsp table or ground rock salt
- Dry Masala
- Equipment:
- a chopping board
- a long sharp knife
- a frypan
- a dry mixer
- a deep frypan for the chicken
Steps:
Making the dry masala
- In a frypan, dry roast the 1 Tbsp fennel seeds, 1 Tbsp cumin seeds, 1 Tbsp coriander seeds and 1 Tbsp black peppercorns.
- Allow to cool and then and to your dry spice mixer.
- Add 1 tsp kashmiri chili powder as well and then give it a quick pulse.
Spice heaven:

Coarsely ground dry masala (looks and smells amazing):
Cooking the chicken
- Peel and dice the 200g of red shallots.
- Chop the 1kg of chicken thighs short ways to get roughly 2.5cm chunks.
- In a deep frypan heat the 50ml olive oil.
- Add the 1 tsp fennel seeds, 1 Tbsp dagarful and the 8cm of cinnamon stick and stir for a few minutes.
- Add a very large handful of curry leaves and the 200g of red shallots. Stir until the latter are soft.
- Add the 1kg of chicken and stir for a few minutes.
- Add and stir for a few minutes the:
- dry masala
- 4 cloves garlic
- 4cm ginger
- 1 tsp raw sugar
- 1 tsp table salt
- Add the 200ml chicken stock.
- Cook for about 45 minutes or until the sauce is much reduced and sticky.
I love the colours of this dish’s ingredients:

Sauté the spices, red shallots and curry leaves:
Add the chicken, stir and then add the garlic, ginger, sugar, salt and dry masala:
Cook until the sauce is thick:

Serving
- Cook your favourite rice, mine is basmati :).
- Steam some green vegetables for a splash of colour.

Enjoy,
PK
Here are more Indian cuisine posts and Rick Stein recipes:
Written by
·
-

Giuseppe’s Flourless Chocolate Cake
Gus isn’t claiming this is his own recipe but he baked this awesome flourless cake and I asked him if I could share the recipe with you. You should have seen my toddler’s eyes when he tasted it.
Gus said it was really easy to make (I think he is too modest) but he has a hot tip for the candied orange peel. Never leave candied orange on the burner and get distracted. It doesn’t end well for the pan nor the hob :).

Steps
- Baking the cake.
- Making the candied orange topping.
Ingredients
- 180g dark chocolate
- 160g unsalted butter
- 200g almond meal
- 150g caster sugar
- 5 eggs
- 1 large orange
- 1/2 cup water
- 1/2 cup raw sugar
Equipment
- 1 bowl to melt the butter and chocolate (or a saucepan)
- 1 bowl for the egg whites
- 1 bowl for the egg yolks
- 2 whisks
- 1 springform cake tin (about 25 -28 cm)
- 1 chopping board
- a peeler or citrus zester
- a long sharp knife
- a small saucepan for the orange peel
Steps:
Baking the cake
- Heat your oven to 160°C.
- Melt the dark chocolate and butter and mix together, set aside.
- Separate the eggs and in one bowl beat whites until firm peaks form.
- Beat yolks & caster sugar until pale & creamy in another bowl.
- Add slightly cooled chocolate mixture to the egg yolk mixture, fold in gently.
- Add almond meal to this mix, fold in.
- Fold in beaten egg whites, in 2 or 3 lots folding in gently. Tip: always add beaten egg whites in small batches, these add air and support the mix as there is no yeast to leaven the mix. You will find the last lot of egg whites will fold in easily and not have all the air swished out.
- Line the base of a springform cake tin with baking paper, grease base and sides with butter.
- Pour mix in and bake for about 40 min. It should be moist inside with a thin crust that will form cracks.
Making the candied orange topping 🍊
- Wash the orange well.
- Using a vegetable peeler, peel orange, try not to take the white pith. Just get the peel.
- On a board cut the peel strips as thin as possible (this is the time consuming part) but they can be as large as you like.
- In a small saucepan mix equal parts of water and sugar, I usually do half cup of each.
- Heat to dissolve sugar and then add the sliced orange peel.
- Allow to boil and then turn heat down to a simmer.
- Allow to simmer gently for about 30-40 min, liquid will evaporate. I usually add a little more water2 or 3 times while simmering.
- When you are happy it’s “candied” enough take off the heat, allow to cool slightly, it will be very hot and I have learned this the hard way from trying to taste the syrup :).
- Place candied peel on cake. You can also pour the remaining syrup over the cake, it will have a nice orange flavour
Enjoy,
😊
Gus
YOU MIGHT ALSO LIKE
MORE VEGETARIAN , GLUTEN-FREE INGREDIENTS AND MEALS
Please consider subscribing to a weekly email summary of our posts or check us out on Facebook @growitcatchitcookit.
[mc4wp_form id=”15771″]
Written by
·
-

Beetroot Powder
I looked everywhere and couldn’t find the beetroot powder in the shops that I needed for a butter chicken. I was in my local grocery store looking for it and about to give up when on the way out I saw some fresh beetroot.
So I made my own dried beetroot to get the powder and along the way got lots of yummy beetroot crisps too.
Steps:
Take a fresh beetroot and peel it.
Cut it into really thin slices as this will aid the drying process.

I then used my oven, as it was already on from cooking the previous dish and cooling down, to slowly dry the slices out.
You can use a dehydrator if you have one.


Keep the crisps whole in an airtight bag. You can then munch or grind them as needed.
Enjoy,
PK
Links:
- see more beetroot posts here
- go to all ingredients
Written by
·
-

PK’s Fettuccine Chicken Alfredo
Fettuccine Alfredo is a pasta dish made from freshly made fettuccine tossed only with Parmigiano-Reggiano and butter.
This was my first attempt at making it and I wanted to make the sauce from scratch. I chose this ‘food network’ recipe as a base to experiment from and the results were simply amazing. The addition of 2 cups of heavy cream might have had something to do with this :).

I used an Australian made Parmesan rather than certified Parmigiano-Reggiano which is only made in one of several regions in northern France. I certainly will be using it next time for a comparison. [ edit – I did 🙂 ]
Similarly, although I used San Remo Brand’s Traditional Egg Fettuccine No 77 and thought it an excellent product, I am going to be making my own fettuccine next time. [ edit – I did 🙂 ]
You will be:
- Boiling the pasta.
- Cooking the bacon and chicken.
- Making the alfredo sauce.
- Combining everything and serving hot.
You will need:
- Ingredients:
- a couple slugs of olive oil
- 225g fettuccine
- 2 chicken breasts, skin off, cut into thin but wide slices (see photos below)
- a handful of bacon rashers, finely chopped
- 8 Tbsp butter
- 2 cups heavy cream
- ground rock salt and ground black peppercorns to taste
- ground nutmeg to taste
- a very small handful of oregano, chopped
- 1.5 cups Parmigiano-Reggiano or Parmesan, finely grated
- Equipment:
- a chopping board
- a long sharp knife
- a large saucepan for the pasta
- a frypan
- a bowl to put the cooked chicken and bacon in
- a colander to drain the pasta
Boiling the pasta
- You are going to need 15 minutes to get everything else ready so put the pasta into boiling water with a slug of olive oil and a generous amount of salt.
- Whilst doing the recipe’s other steps, cook the pasta until molto al dente (I chuck the odd bit onto the kitchen tiles to test it, if it sticks it is ready) and remember that the last step in this recipe is to mix everything together and serve quickly.

Cooking the bacon and chicken
- Cook a good handful of chopped bacon in some olive oil until crispy, putting it aside and cleaning the frypan with paper towel. Return it to the heat.
- Melt 2 Tbsp of the butter in the frypan and cook the 2 chicken breasts worth of slices over medium heat. Remember that the slices won’t take long each side to cook through and the chicken will go chewy if you over cook it.
- Add the bacon back to the frypan and give everything a gentle toss.
- Put the chicken and bacon aside in a bowl and wipe clean the bottom of the frypan.
Bacon goodness:
Cook the chicken and combine the with the bacon:
Making the alfredo sauce
- Bring the frypan back to the heat and melt 6 Tbsp of butter.
- Whisk the 2 cups of heavy cream into the butter.
- Add the very small handful of chopped oregano, salt, pepper and at least one pinch of ground nutmeg.
- Keep stirring gently for several minutes and then fold the 1.5 cups of finely grated Parmigiano-Reggiano or Parmesan into the sauce.

Combining everything and serving hot
- Chuck the drained pasta, the chicken and the bacon into the sauce and gently mix everything together.
- Add large portions to the serving bowls and serve with cracked black peppercorns and grated Parmigiano-Reggiano.

Enjoy,
PK
YOU MIGHT ALSO LIKE
PASTA DISHES
MORE ITALIAN CUISINE
Please consider subscribing to a weekly email summary of our posts or check us out on Facebook @growitcatchitcookit.
[mc4wp_form id=”15771″]
Written by
·
-

KT’s NoFuss Mini Quiches
Thankfully these are as easy to make as they are to eat. In our house they have a habit of disappearing when my wife isn’t looking :).
I didn’t even get to take a photo of the finished products cooling on the racks.
Oh wait here is one from last time she made them:

You will be:
- Preparing the filling.
- Cutting and pressing puff pastry into baking tins to make the bases.
- Spooning the mixture to bases and cooking.
You will need:
- Ingredients:
- 2 sheets of puff pastry
- 125g cheddar cheese, grated (use your favourite hard cheese)
- 125g ham slices, finely chopped
- 3 Tbsp heavy cream (whipping cream)
- 0.5 Tbsp whole grain mustard
- 1 egg
- ground black peppercorns to taste
- ground rock salt to taste (I don’t use any as the cheese and bacon are salty enough)
- Equipment
- a chopping board
- a long sharp knife
- a mixing bowl
- 7cm diameter biscuit cutter
- 2 shallow mini pie/bun trays (12 depressions per tray)
Steps:
Prepare the filling
- In a mixing bowl add the:
- 125g grated cheddar cheese
- 125g finely chopped ham
- 3 Tbsp heavy cream
- 0.5 Tbsp whole grain mustard
- 1 egg
- ground black peppercorns to taste
- Mix everything thoroughly but gently.

Cutting and pressing puff pastry into baking tins to make the bases
- Lay the sheets of puff pastry out.
- Cut 24 circles out of them using the cookie cutter and press these into the trays.

Spooning the mixture to bases and cooking
- Spoon a small amount of the filling into each base.

- Cook for 15 minutes at 200°C in a fan forced oven.

Eat them hot or freeze them. Personally I like them cold and think they make a great lunch box snack.
If they last that long :).
Enjoy,
PK
Written by
·