Tag: preserving
-

2L Fermenting Glass Jar With Airlock
The addition of a food grade one-way valve turns this preserving jar into a small batch fermentation vessel. It should cost less than $30AUD pre-made and you can make your own if you buy the airlock for around $10AUD.
Perfect for making thinks like:
- cider
- ginger beer
- kimchi
- sauerkraut
- kombucha
- vinegar


Tip: Never fill a cold glass vessel with boiling water without warming it in a bath of hot water from the tap. It will crack otherwise.
Enjoy,
PK
Related Links:
- see PK’s Small Batch Hard Ginger Beer
- see more preserving posts here
- see more equipment posts here
Written by
·
-

Ben’s Windfall Lime Pickle
This windfall lime pickle is a prime example of preserving your harvests. I encourage you to eat fresh produce during their particular growing season and then their (hopefully made by you) preserved cousins off season. The mass produced commercial versions just don’t compare.
It’s important to use very ripe limes. I use the ones that have fallen from the tree, or are about to, that have a yellowing skin and lots of juice :).
These are the sweetest, using under ripe limes will give you a pickle that is very tart. I wash the limes in a weak vinegar:water solution prior to using, to make sure they are clean and not going to contaminate the pickle (because they have come from the floor and I have dogs).
To sterilise the jars, I put them through the dishwasher and then boil them in a pot of water. If the pickle isn’t ready when the jars are, pop them in the oven (no plastic lids) on very low to keep them hot. You should put hot pickle into hot jars for two reasons. One, because you won’t thermally shock and crack the jars and two because as the jar and mixture cool they will form a vacuum, meaning the pickle lasts longer.
The recipe:
You will need
- 30 limes, washed and diced into ~1cm blocks (skin on)
- 10-20 small chilis, sliced (add to taste)
- 2 tsp turmeric
- 2 tbsp salt (sea salt preferred always)
- 4 tbsp oil (olive or sunflower work best)
- 2 tsp fenugreek
- 2 tsp aniseed or fennel (I use fennel seed)
- 2 tsp garlic seed
- 2 tsp chilli flakes
- ~10 cm ginger grated
- 4 tbsp raw brown sugar
- 2 tbsp vinegar (i use apple cider or brown malt, but also you can use white wine)
Method
- Combine limes, chilli, salt, turmeric into a glass or ceramic bowl, mix and leave at room temperature overnight.
- Heat oil in large pot, add fenugreek, fennel seed, chilli flakes, ginger, garlic powder and cook off to release flavour (2-3 minutes).
- Add lime and chilli mixture, mix well and let it simmer and then turn the heat down for about 20 minutes, or until the lime softens and the mixture thickens.
- Add in the vinegar and sugar, mix well and cook for about 5 minutes. The vinegar acts as a preservative.
- Let the mixture cool slightly, then add to hot, sterilised jars. Seal jars, and place into a cool, dark spot for ~1 month to let the flavour develop.
Cleaning the limes:

Leave the mix overnight:

The finished product (we cracked into it early):


Hope you have more patience than me,
Ben 🙂
Here are some additional preserving food ideas and more from Ben:
Written by
·
-

PK Makes Apple Cider Vinegar
So I took one of my reader’s suggestions last week when I was making my hard cider that I make some apple cider vinegar at the same time.
Here you go Grant :).
I found this wonderful method on Tales of a Kitchen and gave it a go with the idea of making my own starter ‘mother‘ for next time and also getting some yummy vinegar for cooking.
Don’t forget careful hygiene with this method. I sterilised everything with boiling water before I started and if the mix starts to smell or look funky I will throw it out and start again.
Steps:
I took some of the left over apples from the cider pressing and popped them into a large glass beer stein. You can use any part of the apple, even the cores and seeds!
I added 4 tsp of raw sugar and enough filtered water to cover the apples. I had a problem keeping the apple chunks down and below the water line. I tried an orange in a bag but it got mouldy :(.
Some more Googling and I came across phickle.com. They suggested using a hessian bag and some ceramic pie weights. I can’t spruik this idea enough. The bag pushes the fruit down and stops them going off and mouldy.
I then put a tea towel over the top of the stein and placed it at the back of a cupboard. Bubbles started almost immediately showing that the fermentation had begun. A few days later and I had a nice creamy layer of ‘mother’ and a nice sweet smell.
Update (1 month in):
I checked several times over the last month that the ‘mother’ was still white and there was no mould or nasty smells. Everything looked good so I moved on to the next stage.
I strained the liquid in a metal sieve and discarded the apples. They looked nice though.

Then I added the strained liquid and the dregs from the beer stein to a clean jar. I will leave this mix for another 4 to 6 weeks, stirring it every now and again.

See you in another 6 weeks, I hope :D.
Wishing you fun in the kitchen,
PK
Related Links:
Please consider subscribing to get a weekly email summary of our posts.
[mc4wp_form id=”15771″]
Written by
·
-

PK’s Making Sausages The Italian Way
Today I was invited to join an Italian family’s yearly sausage making day. Making sausages the old fashion way means lots of hard work, lots of family banter and lots of laughter. I felt like part of the family and I promised to come back next year, if only for the great lunch they fed us.
The pork mince had been seasoned the night before. Even if I did know the full list of ingredients I couldn’t tell you but I did notice a healthy amount of chili seeds. That and a carefully measured amount of salt as one would expect.
We balled the seasoned mince up and then fed those through hand cranked meat mincers and into natural sausage casings. The end result will hang for several weeks and if they are as good as last year’s we are in for a treat :).
Thanks for the invite and a great memory,
PK
Balling the seasoned mince:

Into the mincer they went:
Then they are hung to dry:


Written by
·
-
PK Makes Sausages The Italian Way
Today I was invited to join an Italian family’s yearly sausage making day. Making sausages the old fashion way means lots of hard work, lots of family banter and lots of laughter. I felt like part of the family and I promised to come back next year, if only for the great lunch they fed us.
The pork mince had been seasoned the night before. Even if I did know the full list of ingredients I couldn’t tell you but I did notice a healthy amount of chili seeds. That and a carefully measured amount of salt as one would expect.
We balled the seasoned mince up and then fed those through hand cranked meat mincers and into natural sausage casings. The end result will hang for several weeks and if they are as good as last year’s we are in for a treat :).
Balling the seasoned mince:

Into the mincer they went:
Then they are hung to dry:
Some are cooked fresh as payment for the workers. 🙂
Dried they last for ages:

Thanks for the invite and a great memory,
PK
PS I have been invited back ever since (PK 2018)
YOU MIGHT ALSO LIKE
ITALIAN CUISINE
HOW TO PRESERVE FOOD
Please consider subscribing to a weekly email summary of our posts or check us out on Facebook @growitcatchitcookit.
[mc4wp_form id=”15771″]
Written by
·
-

PK’s Adults Only Hard Cider
There is a long tradition of making hard cider in European culture. Farms would have a few apple trees of varietals just right for making cider. Go back far enough and you hear stories of agricultural workers either being paid in cider or being allowed to take windfall apples for free to make their own. In England it was more often consumed than wine and aged cider with its vinegary goodness would have packed quite a punch.
I love knowing that what I am drinking is preservative free, gave older or fallen apples a second chance, supported Aussie farmers and reduced food processing and transport costs. However I just learnt that cider isn’t just for drinking.
One of my favourite chefs, Hugh Fearnley-Whittingstall, writes “Cider is fabulous in stews – I adore rabbit cooked with cider and cream, pork in cider is a classic, and lamb works well, too. Once mellowed by long cooking, that fruity flavour mingles beautifully with the richness of the meat – a glassful added to the dish in which you roast a leg of lamb or a chicken will help produce a gorgeous gravy. It’s also fabulous as part of the brining liquid for a home-cured ham.”
I use Granny Smith apples in this recipe (the colour of the fresh juice will blow you away) and although not a popular choice there are commercial breweries that use them. I don’t use any added sugar during the primary fermentation cycle. I also don’t bottle my cider (secondary fermentation cycle) and hence it is non-carbonated when I drink it.
After the yeast has consumed all of the apple sugars they will die and gas will cease to escape the airlock. They will however leave a blanket of carbon dioxide, over the cider, that doesn’t have enough pressure to escape. This gas blanket (plus the alcohol) will stop the cider spoiling while you wait for the flavours to mature. I have heard of people waiting months but the longest I have resisted the temptation to get stuck in is about 4 weeks :).
When I do start drinking it I put the demijohn in the fridge to make sure fermentation has stopped, give it a nice chill and keep it fresh. The airlock and bung get replaced with some plastic wrap.
Note: Please only follow this recipe if you are of a legal age to drink in your country.
You will need:
- Ingredients:
- ~8-10kg Granny Smith apples
- ~6 raisins (to add some wild yeasts to the mix)
- 1 teabag (to add some extra tannins to the mix)
- a sachet of yeast (I use whatever is available, in this case bakers yeast)
- raw sugar to taste (optional and I don’t use any)
- boiling water (to sanitise everything)
- Equipment
- a small bowl
- a fork
- a chopping board
- a long sharp knife
- a teacup
- a juicer (I borrowed a Kuvings cold press juicer from a friend)
- a demijohn (a 4.5 litre glass brewing vessel) with a matching airlock and bung
- a funnel
Steps:
- Pour boiling water into the demijohn and let it stand. Pay particular attention to hygiene here. Make sure everything is clean and including the demijohn’s mouth and outside surfaces.
- Run boiling water through the airlock and soak the bung in boiling water too.
- Add the contents of one sachet of yeast to a small amount of warm water and give it a quick stir. We do this first so that it has time to start multiplying. A few bubbles here and there let you know it is working and it only took the juicing time to be alive and kicking :).
- Make a cup of very weak tea and let it cool while you bust out your juicer.
- Juice the apples and pour the liquid into the demijohn in batches.
- When the demijohn is about two thirds full pour in the yeast mix and add the 6 raisins.
- Swirl the demijohn gently to mix everything.
- Add more apple juice until you are happy with the level.
- Pop on the bung and the airlock.
- Fill the airlock with recently boiled water that you have let cool.
That is it. It should only take a few hours for the airlock to start making a slow but steady bubbling noise. One of my favourite sounds :).
I leave it inside for its first night and then it goes out to the shed. During winter I put it inside an old fleecy jumper to protect against the cold Perth winter nights. I find this is enough to keep the yeast warm and happy.
Hope you enjoy the process and result as much as I do,
PK
Yeast and tea ready:
Juice your apples:
Add the raisins and the cold tea, add the bung and airlock and then add some clean water to the airlock:
Out to the shed:
Written by
·
- Ingredients:
-
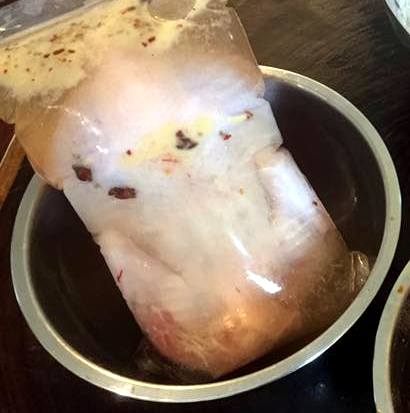
Ben’s Brining Tips
Ben is over-talented at growing plants and raising animals for meat so he had to become an expert in cooking and preserving too :).
Here he writes about brining meat:
The brine I make can be used on all meats, I regularly use it for seafood (particularly fish I intend to smoke), poultry (chicken, turkey) and pork. It’s important that the meat is not over brined, or it will become overly salty.
Also, you might notice that meat (especially chicken) goes darker than normal when cooking. Don’t panic if it looks a bit strange but do check the internal temperature of the meat.
It’s very important to remember that whatever ingredients you use, the meat will be soaking in it and taking it up. So avoid ingredients that have additives or preservatives. In particular, you must use non-iodised salt that does not have an anti-caking agent in it. For best results, i use natural sea salt and raw sugar.
The brine helps the meat to preserve moisture and flavour in the cooking process. You’ll notice for fish that at the end of brining there will be a lot of slime in the water. When cooked, the meat will be more flavoursome, more moist and fall apart easier. The brine does this by affecting the proteins of the meat (I don’t know how). PK said something about tightening them and that breaks them apart.
[word
Making the brine:
- Put enough water to cover the meat into a bowl. Dissolve salt in the water until a raw potato floats, and then add the same amount of sugar. At this point the brine is done. If you did nothing else you’ve brined your meat! This is where i will stop for seafood, but for other meats, read on.
- Add flavour. There is no end to what you can/can’t add, and no specific quantities. A general guide for poultry is mustard powder (2 tsp), star anise (generally 1 or 2 will suffice), smoked paprika (1 tsp), cayenne (1/2 tsp) and maybe some juniper berries (4-5).
- Put the meat into a bowl or ziplock bag (I prefer the bag), cover with the brine mixture. If you’ve made too much brine, ensure the flavours are transferred (i.e. star anise and juniper berries). Make sure all the cavities are also filled with brine, and there are no air pockets
- Leave in the fridge over night (8-12 hours)
- Take it out of the brine, rinse off and pat dry (make sure you clean the sink down well after).
- Leave in the fridge so the skin dries and goes crispy
- Cook your meat however you like.

Enjoy the brine revolution,
Ben
Related Links:
Please consider subscribing to get a weekly email summary of our posts.
[mc4wp_form id=”15771″]
Written by
·