Tag: egg
-
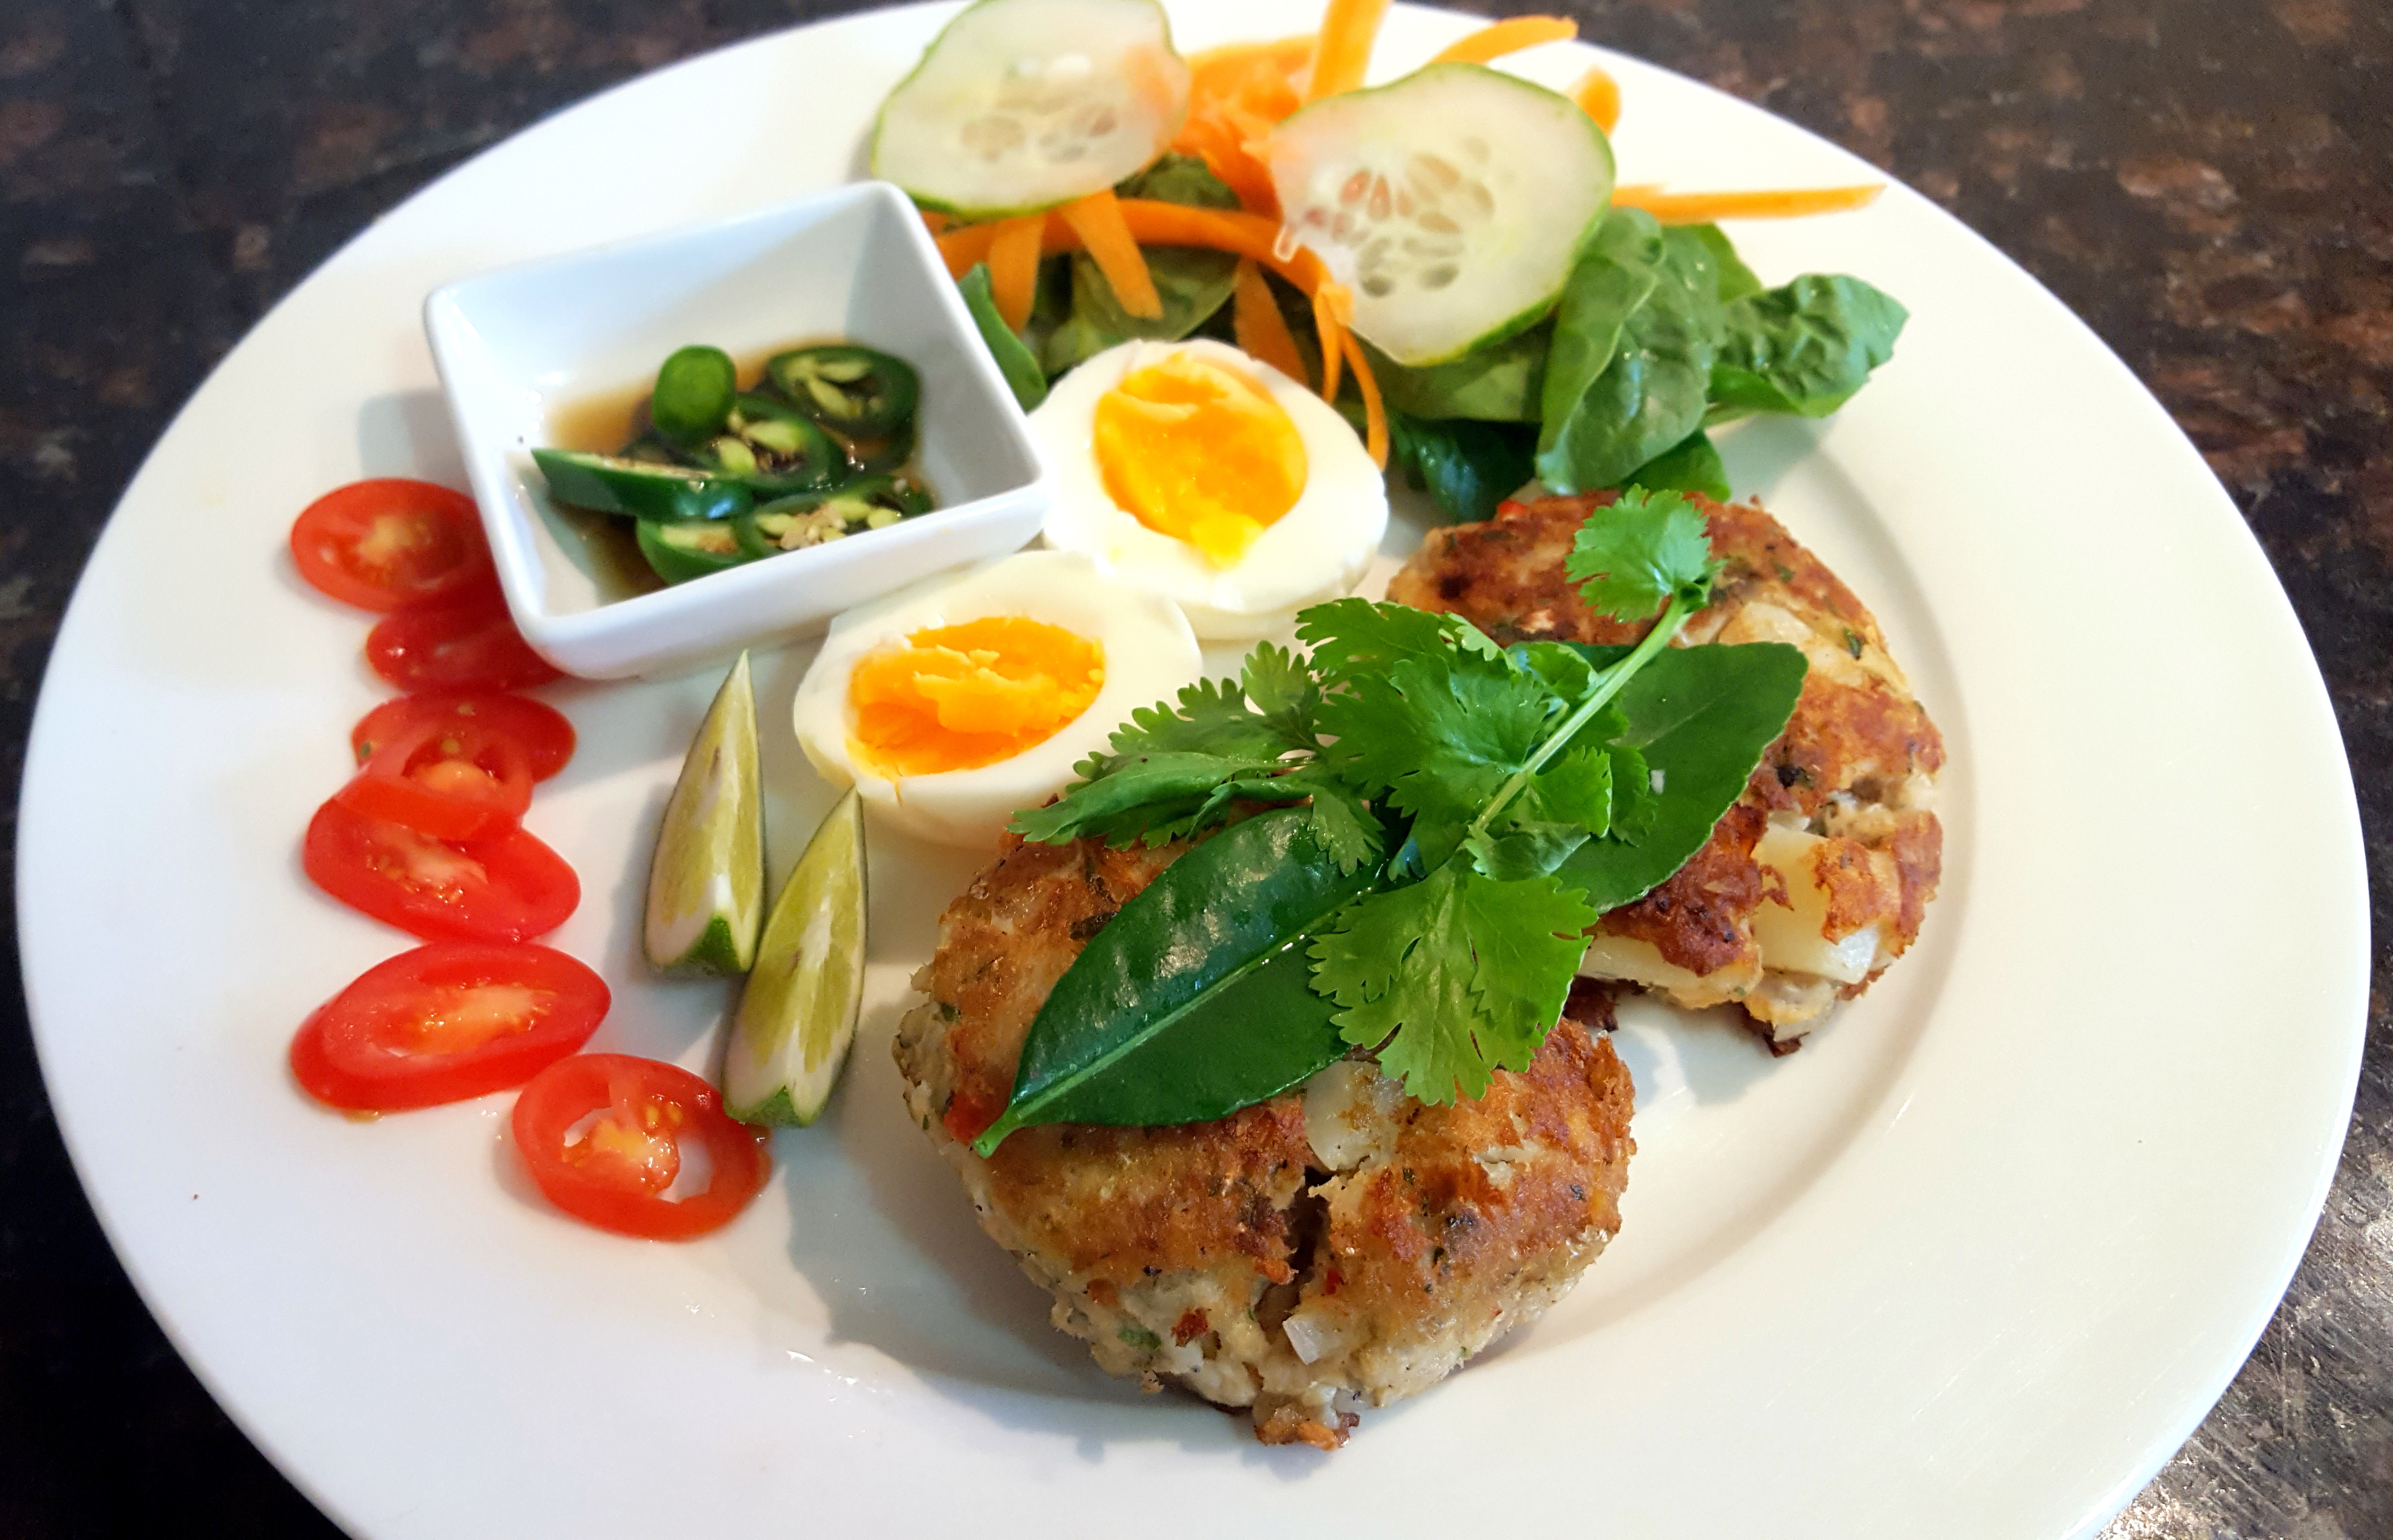
PK’s Easy Thai Fish Cakes
Fish cakes taste great and are an amazing way of making a little bit of fish go further. They were a staple growing up and one of the dishes, my mum cooked us, that will always stay with me :).

I never use a recipe and no two batches come out the same but that is half the fun.
Below I am doing a take on Thai fish cakes but I am just as likely to make them coated in breadcrumbs. Sometimes I keep the potatoes chunky, sometimes I mash everything well to give a smoother texture.
I just follow two basic rules in that I use a 1:1 ratio of fish to parboiled potatoes and I like to add colour by using finely minced fresh vegetables in the mix itself. If you find the cakes fall apart during cooking, try a bit more egg in the mix next time.
Parboil the potatoes:

Mash your fish (I am using canned John West Pink Salmon):

Prepare the vegetables (I am going for a Thai taste so I am using lime zest, shallots, coriander, garlic and some red capsicum for colour):

Whisk an egg or two and mix everything up (I did this gently as I wanted a chunky look):
Make small or large cakes, using your hands, as you please and then pop them in the fridge for a bit (just look at the colours, beautiful):

A quick shallow fry is all that is needed:

Serve with some greens and you favourite sides:

Enjoy,
PK
YOU MIGHT ALSO LIKE
THAI CUISINE
SOUTH EAST ASIAN FOOD
MORE POTATO DISHES
MORE NORECIPE GOODNESS
Please consider subscribing to a weekly email summary of our posts or check us out on Facebook @growitcatchitcookit.
[mc4wp_form id=”15771″]
Written by
·
-

Giuseppe’s Flourless Chocolate Cake
Gus isn’t claiming this is his own recipe but he baked this awesome flourless cake and I asked him if I could share the recipe with you. You should have seen my toddler’s eyes when he tasted it.
Gus said it was really easy to make (I think he is too modest) but he has a hot tip for the candied orange peel. Never leave candied orange on the burner and get distracted. It doesn’t end well for the pan nor the hob :).

Steps
- Baking the cake.
- Making the candied orange topping.
Ingredients
- 180g dark chocolate
- 160g unsalted butter
- 200g almond meal
- 150g caster sugar
- 5 eggs
- 1 large orange
- 1/2 cup water
- 1/2 cup raw sugar
Equipment
- 1 bowl to melt the butter and chocolate (or a saucepan)
- 1 bowl for the egg whites
- 1 bowl for the egg yolks
- 2 whisks
- 1 springform cake tin (about 25 -28 cm)
- 1 chopping board
- a peeler or citrus zester
- a long sharp knife
- a small saucepan for the orange peel
Steps:
Baking the cake
- Heat your oven to 160°C.
- Melt the dark chocolate and butter and mix together, set aside.
- Separate the eggs and in one bowl beat whites until firm peaks form.
- Beat yolks & caster sugar until pale & creamy in another bowl.
- Add slightly cooled chocolate mixture to the egg yolk mixture, fold in gently.
- Add almond meal to this mix, fold in.
- Fold in beaten egg whites, in 2 or 3 lots folding in gently. Tip: always add beaten egg whites in small batches, these add air and support the mix as there is no yeast to leaven the mix. You will find the last lot of egg whites will fold in easily and not have all the air swished out.
- Line the base of a springform cake tin with baking paper, grease base and sides with butter.
- Pour mix in and bake for about 40 min. It should be moist inside with a thin crust that will form cracks.
Making the candied orange topping 🍊
- Wash the orange well.
- Using a vegetable peeler, peel orange, try not to take the white pith. Just get the peel.
- On a board cut the peel strips as thin as possible (this is the time consuming part) but they can be as large as you like.
- In a small saucepan mix equal parts of water and sugar, I usually do half cup of each.
- Heat to dissolve sugar and then add the sliced orange peel.
- Allow to boil and then turn heat down to a simmer.
- Allow to simmer gently for about 30-40 min, liquid will evaporate. I usually add a little more water2 or 3 times while simmering.
- When you are happy it’s “candied” enough take off the heat, allow to cool slightly, it will be very hot and I have learned this the hard way from trying to taste the syrup :).
- Place candied peel on cake. You can also pour the remaining syrup over the cake, it will have a nice orange flavour
Enjoy,
😊
Gus
YOU MIGHT ALSO LIKE
MORE VEGETARIAN , GLUTEN-FREE INGREDIENTS AND MEALS
Please consider subscribing to a weekly email summary of our posts or check us out on Facebook @growitcatchitcookit.
[mc4wp_form id=”15771″]
Written by
·
-

KT’s NoFuss Mini Quiches
Thankfully these are as easy to make as they are to eat. In our house they have a habit of disappearing when my wife isn’t looking :).
I didn’t even get to take a photo of the finished products cooling on the racks.
Oh wait here is one from last time she made them:

You will be:
- Preparing the filling.
- Cutting and pressing puff pastry into baking tins to make the bases.
- Spooning the mixture to bases and cooking.
You will need:
- Ingredients:
- 2 sheets of puff pastry
- 125g cheddar cheese, grated (use your favourite hard cheese)
- 125g ham slices, finely chopped
- 3 Tbsp heavy cream (whipping cream)
- 0.5 Tbsp whole grain mustard
- 1 egg
- ground black peppercorns to taste
- ground rock salt to taste (I don’t use any as the cheese and bacon are salty enough)
- Equipment
- a chopping board
- a long sharp knife
- a mixing bowl
- 7cm diameter biscuit cutter
- 2 shallow mini pie/bun trays (12 depressions per tray)
Steps:
Prepare the filling
- In a mixing bowl add the:
- 125g grated cheddar cheese
- 125g finely chopped ham
- 3 Tbsp heavy cream
- 0.5 Tbsp whole grain mustard
- 1 egg
- ground black peppercorns to taste
- Mix everything thoroughly but gently.

Cutting and pressing puff pastry into baking tins to make the bases
- Lay the sheets of puff pastry out.
- Cut 24 circles out of them using the cookie cutter and press these into the trays.

Spooning the mixture to bases and cooking
- Spoon a small amount of the filling into each base.

- Cook for 15 minutes at 200°C in a fan forced oven.

Eat them hot or freeze them. Personally I like them cold and think they make a great lunch box snack.
If they last that long :).
Enjoy,
PK
Written by
·
-
KT’s Easy Mini Quiches
Thankfully these are as easy to make as they are to eat. In our house, they have a habit of disappearing when my wife isn’t looking :).
I didn’t even get to take a photo of the finished products cooling on the racks.

You will be:
- Preparing the filling.
- Cutting and pressing puff pastry into baking tins to make the bases.
- Spooning the mixture to bases and cooking.
You will need:
- Ingredients:
- 2 sheets of puff pastry
- 125g cheddar cheese, grated (use your favourite hard cheese)
- 125g ham slices, finely chopped
- 3 Tbsp heavy cream (whipping cream)
- 0.5 Tbsp whole grain mustard
- 1 egg
- ground black peppercorns to taste
- ground rock salt to taste (I don’t use any as the cheese and bacon are salty enough)
- Equipment
- a chopping board
- a long sharp knife
- a mixing bowl
- 7cm diameter biscuit cutter
- 2 shallow mini pie/bun trays (12 depressions per tray)
Steps:
Prepare the filling
- In a mixing bowl add the:
- 125g grated cheddar cheese
- 125g finely chopped ham
- 3 Tbsp heavy cream
- 0.5 Tbsp whole grain mustard
- 1 egg
- ground black peppercorns to taste
- Mix everything thoroughly but gently.
Cutting and pressing puff pastry into baking tins to make the bases
- Lay the sheets of puff pastry out.
- Cut 24 circles out of them using the cookie cutter.
- Press the circles gently into the trays.
Spooning the mixture to bases and cooking
- Spoon a small amount of the filling into each base.
- Cook for 15 minutes at 200°C in a fan forced oven.
Serving
Eat them hot or freeze them. Personally I like them cold and think they make a great lunch box snack.
If they last that long :).
Enjoy,
PK for KT
Here are some more egg dishes and posts by KT:
Written by
·
-

KT’s Dippy Eggs and Soldiers
My toddler loves a soft boiled egg and soldiers and when he wants them for breakfast he asks for ‘dippy eggs’. The name has stuck I am happy to say :).
The problem was that I had always cooked hard boiled eggs, using this method, growing up. So I had to ask my wife if she knew how to cook a runny egg. Ironically, even though she only eats poached eggs, she remembered a recipe from BabyMac’s blog (see it here).
I gave it a try and was amazed at the results. Now I cook a couple of eggs for the kids’ brekkie (that is what we call breakfast in Australia) and a sneaky extra one for dad. Add a couple of pieces of toast to make “soldiers” and you are done in under 10 minutes!
We try and source ethically produced eggs with
middling success(we now have a good supplier in Gale Force Farm Organic Free Range Eggs ) but that is a story for another day.STEPS:
- Gather the ingredients
- Boil the eggs and cook the toast
- Serving
You will need:
- Ingredients:
- several slices of toast per person
- one chicken egg per person
- butter, margarine or butter blend for the “soldiers”
- Equipment
- a chopping board
- a butter knife to cut the top off the eggs, butter the toast and cut them into “soldiers”
- a small saucepan
- a toaster
- a timer
- a small plate for the toast
- several egg cups
Gather the ingredients
Steps:
- Put aside a few slices of bread for each person and pop them in the toaster but don’t start toasting them yet.
- Take an egg or two per person out of the fridge and let them start to warm up to room temperature.
- Take the butter out of the fridge.
- Fill a saucepan with water, enough to cover the eggs (one layer deep). Bring it to a rolling boil.
- Set your timer to 5 minutes.
Boil the eggs and cook the toast
Steps:
- I used a slotted spoon to lower the eggs into the boiling water and pressed start on the timer. Be very careful not to put a crack in the shells.
- At 2 minutes left, lower the bread into the toaster. We have our toaster set to make semi-frozen bread into golden brown toast in two minutes.
- At 0 minutes take all of the eggs out off the boiling water.
- Butter the toast and cut into 1.5cm wide strips.
Here is a video of what I think a rolling boil looks like:
Serving
My wife says commit when it comes to taking the top off an egg. Take a butter knife and slice the top part off. It isn’t so much a chopping motion as it is a slow but forceful movement from one side to the other all the way through. Previously I used a teaspoon to crack it all the way around and then scoop off the top but never again. My wife’s way is so much better as you get less broken shell in the yolk :).
A very important note: take the tops off all of the eggs. If you don’t they will continue to cook past the runny egg stage that we are trying to achieve.

Thanks to Beth from BabyMac,
PK
Written by
·
-

PK’s Perfect Hard Boiled Eggs
I love hard boiled eggs served warm with a pinch of salt and pepper or cold and sliced in a salad. I want to share a method for making the perfect hard boiled egg that I learnt as a child.
Take a small saucepan and fill with enough room temperature water to cover the eggs. Gently place the eggs into the water, turn the hob on high heat (use a small burner) and bring to a vigorous boil.

Once the water is boiling like crazy, leave the eggs in for a minute longer and then fish them out with a slotted spoon or the like.
Let them cool on the counter top for a bit.
Under gently running cold water, peel the eggs and then pat dry. The older the eggs the easier the shell will come off. Put the shells in your vegetable garden beds to ward of those pesky cabbage moths.
Pat the eggs dry and eat them how you like.
I normally steal a few at this point :).
Look at this free range goodness:

Enjoy,
PK
Related Links:
Please consider subscribing to get a weekly email summary of our posts.
[mc4wp_form id=”15771″]
Written by
·
-
PK’s NoRecipe Perfect Hard Boiled Eggs
I love hard boiled eggs served warm with a pinch of salt and pepper or cold and sliced in a salad. I want to share a method for making the perfect hard boiled egg that I learnt as a child.
Take a small saucepan and fill with enough room temperature water to cover the eggs. Gently place the eggs into the water, turn the hob on high heat (use a small burner) and bring to a vigorous boil.
Once the water is boiling like crazy, leave the eggs in for a minute longer and then fish them out with a slotted spoon or the like.
Let them cool on the counter top for a bit.
Under gently running cold water, peel the eggs and then pat dry. The older the eggs the easier the shell will come off. Put the shells in your vegetable garden beds to ward of those pesky cabbage moths.
Pat the eggs dry and eat them how you like.
I normally steal a few at this point :).
Look at this free range goodness:
Enjoy,
PK
Written by
·
-

Kirsty’s Easy Omelette Muffins
Thanks to my good friend and super-mum Kirsty DeRoach (https://www.instagram.com/babyderoach), I now know another great use for vegetables and leftovers that are past their best.
I can add them to the worm farm and compost bins of course or I can give them a second chance in these amazingly good mini quiches.
Not only are they quick to make (everyone will love that especially parents and lazy cooks) but you also get the satisfaction of reducing the amount of food thrown away unused each week.
I haven’t listed any quantities for most of the ingredients as they will vary each time you make them. Experiment and have some fun. Kirsty is right though, mix up the combinations but don’t put too many different ingredients in any given muffin.
STEPS:
- Whisk the eggs and chop the fillings
- Load your muffin trays
- Serving
You will need:
- Ingredients:
- 12 eggs
- any old vegetables at the back of your fridge
- as much bacon or ham as you want
- your favourite cheese
- table salt to taste
- ground black pepper to taste
- Equipment
- a chopping board
- a long sharp knife
- a whisk
- several muffin tins
- a bowl for whisking the eggs
- a frypan if you are adding bacon.
Whisk the eggs and chop the fillings

Steps:
- Give the eggs a good whisk and set aside. Kirsty told me you can add some cream if it needs using up. Add salt and pepper to taste.
- Chop up your vegetables.
- Chop up your ham or cook and chop up your bacon.
- Grate the cheese.
Load your muffin trays
Steps:
- Pre-heat your oven to 180 degrees Celsius.
- Add some of the whisked eggs to the bottom of each hole of the muffin tins. You will have to experiment with how much.
- Add small quantities of your filling combinations to each hole and top each with the grated cheese so that each are about 3/4 full.
- Push most of the floating ingredients under the egg mixture.
- Cook about 10 minutes or until golden brown.
Serving
Once cool enough, pop them out of the muffin trays. They freeze really well but most of ours don’t get to the freezer :).

Thanks Kirsty,
PK
Written by
·