Tag: baking
-

Baking Powder Vs Baking Soda
Baking powder and bi-carb soda (also called baking soda) are frequently used in cooking and baking.
Although they look similar you don’t want to use them interchangeably!
Baking Soda
Baking Soda is a salt called sodium-bicarbonate. It is used in baking for its leavening (rising) effects as it makes carbon dioxide bubbles when combined with water and an acid (such as lemon juice, vinegar) or heat. Its number in packaged foods is E500. Sounds scary but it is only used as an acidity regulator.
Baking soda is not commonly known as a meat tenderiser but a light sprinkling on meat softens even the chewier cuts. Try it on strips of chicken or beef for that melt in your mouth stir fry. Just remember that a little goes a long way and too much imparts a bitter taste.
Baking Powder
Baking powder is a mix of baking soda and a weak acid (normally acid salts). When water is added the chemical reaction above occurs, the gas bubbles causing baked goods to rise. Cornstarch is often included in the mix to stop the chemical reaction occurring during storage.
Enjoy,
PK
Check out some more posts about baking and ingredients:
Written by
·
-
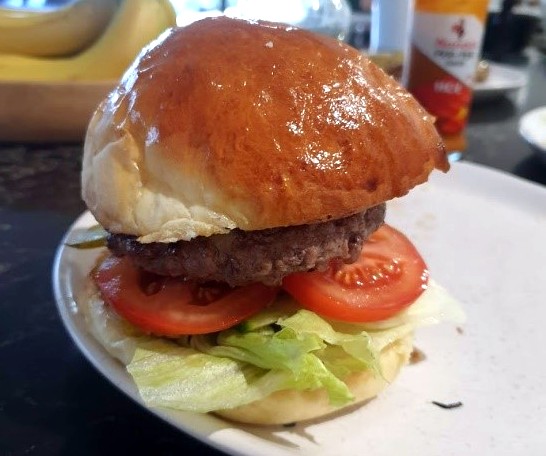
Josh Makes The Best Burger Buns Ever
I use this Joshua Weissman recipe, Japanese techniques and family bread making know how to make the tastiest, lightest burger buns on the planet.
The secret to this recipe is the incorporation of ‘Tangzhong’ (we will making our own below) into the bread dough that gives the bread a fluffy texture.

Helpful tips:
- Don’t use measuring cups for the flour. I have been taught by my partner’s mum that when making bread, to always weigh it out and to do it carefully. No guessing 🙂
- If you want initial success try and follow the recipe exactly as it is written, don’t add extras. The first time I made these buns they were super sticky but that is ok. Leave them sticky and keep to the cooking times below for sure fire success!!
Ingredients
Tangzhong:
- 20g bread flour
- 2 tablespoons (27g) water
- 4 tablespoons (60g) whole milk (not hi-lo etc)
Dough:
- 1/2 cup(120g) whole milk @ 30c – I have got this to about 35 degree’s and still ok. Heat only when at the part of the recipe where it asks for it
- 1 tablespoons (9g) instant yeast
- 320g Bread flour
- 1 teaspoon (7g) fine sea salt
- 2.5 tablespoons (35g) granulated sugar
- 1 whole egg
- 1 egg yolk – Save the egg white and make Meringues (something like “1 egg meringue”)
- 3 tablespoons (42g) unsalted butter, softened
Egg wash:
- 1 whole egg
- splash of whole milk
Step by Step to make the bun’s
Mix the ingredients of the tangzhong. Cook for about 30 seconds on a medium heat (gas cooktop, electric may be different timing). But it should look like porridge. Once its ready, take it out of the saucepan and re-use the sauce pan for the next step.
Using the same pot, heat the milk till it gets to about ~30-35 degree’s. Once it gets to the temperature, remove from heat and add the 9 grams of yeast. Mix together, set a 10 minute timer and set the pan aside.


In the mixing bowl, put the flour, sugar and salt in and combine using a spatula. Put the dough hook on. Put it on a low-medium speed. My Kenwood mixer was set to “2”. Slowly add the tengzhong, milk/yeast and the 1x egg and 1x egg yolk. Move to a “3” or “4” speed on the mixer to a medium speed. Mix until its combined.
SLOWLY add the butter, roughly a 1/3 of it at a time. Keep the mixer going till its well combined and looks smooth.

Wet a clean tea towel (so that its damp) and find a warm place for it to sit for the next 1 to 1.5 hours till its doubled in size. But don’t put it in direct sunlight
Push the mix down and lay it onto a table. Make 6 rolls from the mix.
It will be very sticky, so it will take patience here to get them into a roll shape. It should equate to ~110 grams a roll.
Put them about an inch or so apart, as they rise again, potentially joining together.

Once your happy with the rolls, cover the tray with something like a large baking dish, and move it to warm spot so that they can rise. This will take another 1-1.5 hours

Put the oven on 190 degrees Celsius, about 10 minutes before your bread is finished rising.
Get the egg wash ready and once the rolls are finished rising, brush the entire top of them with the egg wash.

Cook for ~15 minutes or until golden brown.
Serving
I like to make my burger patties out of a special mince from Perth’s very own Gussface Grillah. His mince is fantastic. See https://www.facebook.com/gusfacegrillah/
Roll the gussface mince into 125 gram balls. cook them and assemble your burger how you like it.
Enjoy!!!
Josh
Here is some more from Josh and other baked goodies:
Written by
·
-

Pastry Egg Wash Glaze
There is nothing better to give a nice golden glow to pastry than a wash made of eggs and a splash of milk (a little for each egg used). You get a nice colour and a little bit of shine too.

Give the whole lot a good whisking and then thoroughly cover the pastry surface using a pastry brush.

Here is a quick comparison. Both were cooked for the same time but only the sausage roll on the right has been coated.

Enjoy, PK
YOU MIGHT ALSO LIKE
MORE BAKING POSTS
Please consider subscribing to a weekly email summary of our posts or check us out on Facebook @growitcatchitcookit. [mc4wp_form id=”15771″]
Written by
·
-
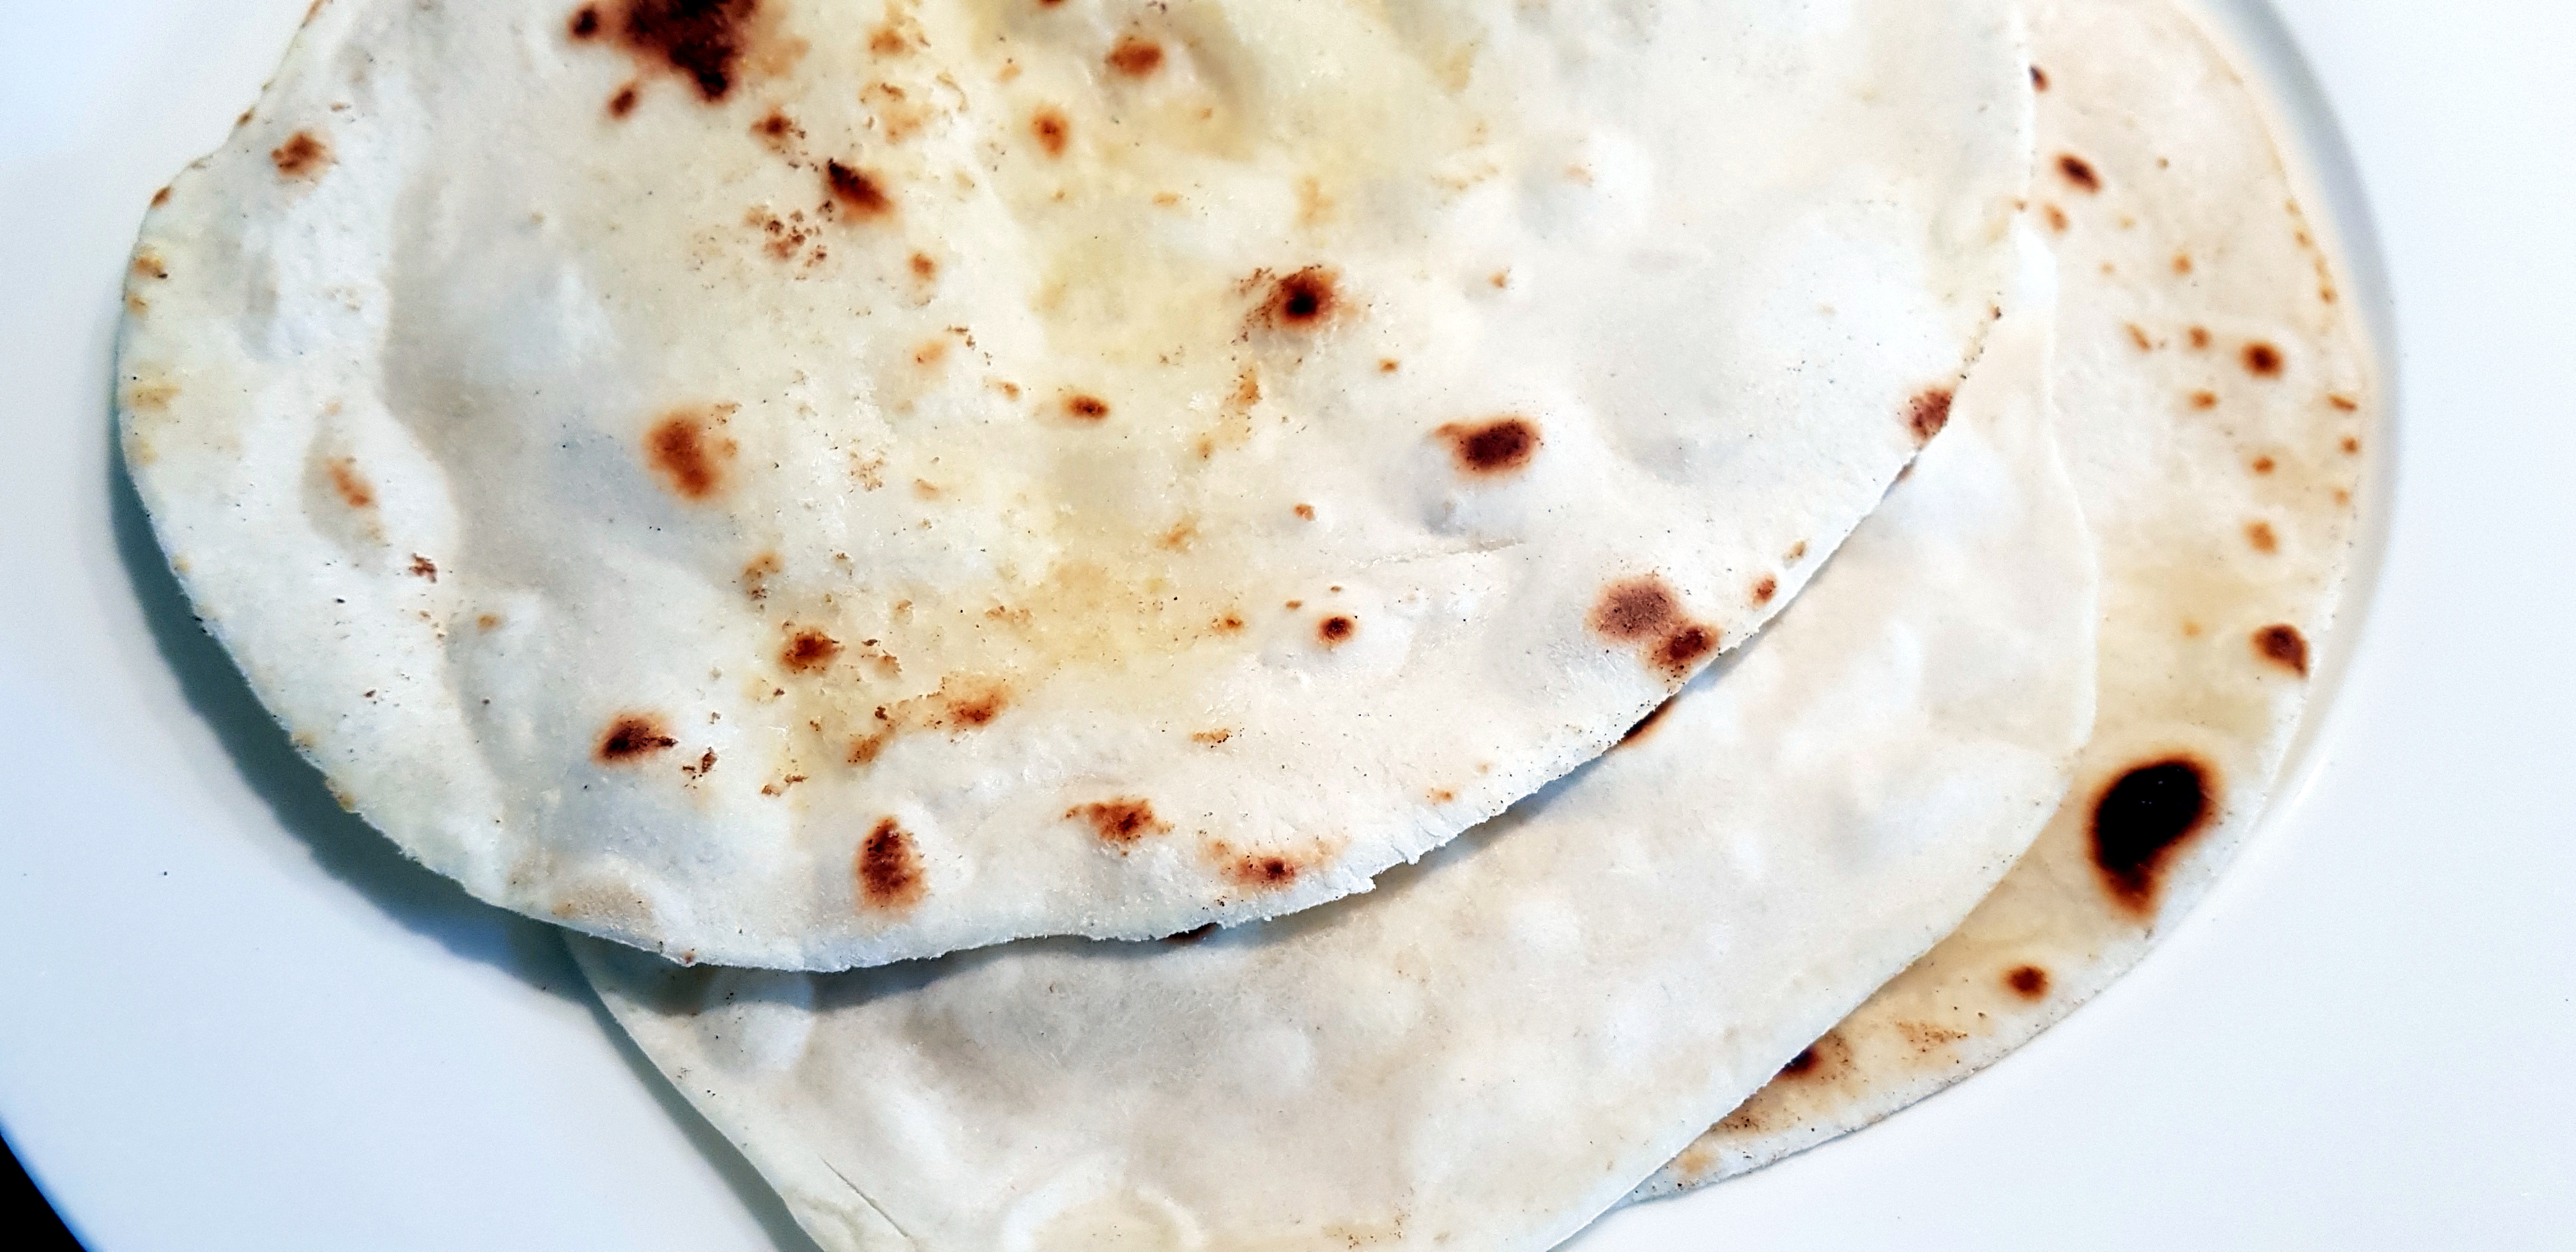
Semolina Flatbread: Rougag
This was my first time making flat bread and I am not much of a baker to begin with so I was stoked with the result. This has to be the oldest form of bread making (that long history in itself is exciting) and you are going need a lot of elbow grease and a bit of practice.

I tend to be drawn to dishes where the simplicity of the ingredients give no hint to the joy that the final product makes you feel. It is what compels me to cook and share my experiences with you.
Steps
- Making the dough
- Kneading the dough
- Cooking the bread
Ingredients (for 3 pieces)
- 100g wheat semolina (preferably from durum wheat and yellow colour)
- 1 tsp salt (I don’t use salt in the rest of my cooking so this was perfect, reduce if needed)
- Cold water
- Plain white flour, to dust work surfaces and hands
- Olive oil to coat fry pan each time
Equipment
- 1 mixing bowl
- 1 rolling pin
- 1 fry pan
Making the dough
- Put the semolina and salt into a mixing bowl.
- Add a tiny bit of cold water and mix with your hands.
- Keep adding cold water and mixing until the dough is elastic and smooth.

Kneading the dough
- Knead the dough for about 15 minutes (if like me you are new to this I have included an external youtube video with a great technique).
- Let the dough sit for 15 minutes and then break into balls (100g of semolina should about get you 3 balls).
- Sprinkle your work surface with some plain white flour and roll the balls out into very flat discs.
Cooking the bread
- Oil your fry pan and bring to a medium low heat.
- Cook one side of the bread, then the other, waiting for it to bubble before flipping.
- Turn the heat down a bit if you find the bread is burning before it is ready to be flipped.
- Wipe the pan clean.
- Repeat steps 1 to 4 for each piece of bread.


Serving
I roughly tore the bread and added them to a Moroccan Style Chickpea Stew With Lamb (ala Chakhchoukha) that I was trying to reverse engineer. It was the perfect taste and texture addition to the meal.
I even used it as a ‘spoon’ to get the last of the sauce from the bowl. A good sign of success and a use of the bread that I understand was probably the whole point mists of time.

Enjoy and please feel free to help me improve my bread making,
PK
YOU MIGHT ALSO LIKE
BAKING
NORTH AFRICAN CUISINE
Please consider subscribing to a weekly email summary of our posts or check us out on Facebook @growitcatchitcookit.
[mc4wp_form id=”15771″]
Written by
·
-

Kat’s Ladybird Cupcakes
To satisfy her latest favourite thing, I decided to make ladybird cupcakes for daughter’s 2nd birthday cake (cup cakes rather than one big cake to allow for mistakes!). Red velvet cupcakes seemed fitting and I’m afraid I used a box mix as I can only concentrate on one thing at a time, decorating or baking.

To make the ladybirds I used pre-made coloured fondant icing and rolled out with lots of icing sugar – that stuff is sticky! I used a circular pastry cutter roughly the same size as the top of the patty pans to cut red circles and the black shapes for the ladybird heads.

After sticking the heads on the bodies using some water, I cleaned the off the icing sugar with a slightly damp soft cloth. I drew the line down the middle of body with and knife and made the black spots by rolling small balls of icing, flattening them and sticking them on with a little water.

I used white and dark chocolate squeezy icing to make the eyes and the mouths.

Once the cupcakes were baked, I cut off the top with a knife to make a flat surface and covered to edge of the patty pans with cream cheese icing and placed the ladybirds on top.

Et voilà,
Kat
Related Links:
- see more kid friendly meals here
Please consider subscribing to get a weekly email summary of our posts.
[mc4wp_form id=”15771″]
Written by
·
-

PK’s Jalapeno, Cheese and Bacon Hot Pockets
A good friend of mine recently asked me where my inspiration comes from when I decide what to cook.
Well, there are a number of factors, sometimes I need to use something in the garden that is going gang busters :).
For example, I have so many home grown Jalapeños and I am always looking for ways to avoid wasting them. There are only so many frozen chilis this family needs and all my friends’ freezers are full of them too.
I came across a recipe called Bacon Jalapeno Cheese Bombs and I knew I had found a winner (see it here). I thought it was excellent but I wanted to use home-made bread dough as I am a dough making newbie.
The result is something that growing up (in Perth, Western Australia) we called ‘hot pockets’. Basically a small chewy bread product full of cheesy goodness.
Notes:
- I was experimenting so they all look a bit different. Next time I am going to glaze them more with the egg mix and also add chopped coriander and diced capsicum.
- My taste-testers also suggested the best ones had a higher ratio of filling to dough and that adding a bit of salt to the dough mix would be good.
You will be:
- Prepping the fillings.
- Making the bread dough.
- Making the hot pockets.
- Cooking the hot pockets.
- Serving them up hot.
You will need:
- Ingredients:
- 600g bread flour and yeast (about enough to make 1 large white loaf)
- extra plain white flour to knead the dough
- a large handful of chopped jalapeños
- 2 large handfuls of cooled chopped crispy bacon
- a large chunk of mozzarella (in brine or vacuum packed is best)
- a small cup of milk or a whisked egg for glazing
- Equipment:
- a chopping board
- a long sharp knife
- a rolling pin
- a large bowl for making dough
- a large bowl for proofing the dough
- an oven tray line with a sheet of baking paper
- a pastry brush
Steps:
Prepping the fillings
- Chop the bacon rashers, cook them on the barbecue (for that smoky taste) and then pop them into the fridge to cool (you need about 2 handfuls).
- Finely chop the jalapeños with the result being about a handful.
- Slice sections of mozzarella, I went for discs about the size of an Australian 20c coin.
Making the bread dough
- Follow the standard method of making bread dough to just after the first rising (making bread dough is so much fun!).
- Give the dough ball a quick kneading and then roll it out somewhat.

Making the hot pockets
- Take a small ball of dough and flatten it down with your hand.
- Pop a disc of mozzarella on it, followed by some crispy bacon bits and chopped jalapeños.
- Then fold the dough around the fillings, crimp and then mould a bit with your hands.
- Pop them on a baking paper lined oven tray as you go.
- When you are finished, glaze each ball with egg or milk and then sprinkle any filling leftovers on the tops :).
Balls of dough ready for fillings:
They see me rollin’ (albeit badly):
Cooking the hot pockets
- Pop the tray into a pre-heated fan forced oven set to 200C.
- Cook for about 15 minutes and or they look golden brown.
Serving them up hot
Even though they can be improved, the result looked, tasted and smelt amazing :).
They were even good the next day after a quick zap in the microwave.

Enjoy,
PK
Related Links:
- see more recipes using chilis here
Please consider subscribing to get a weekly email summary of our posts.
[mc4wp_form id=”15771″]
Written by
·
-

Giuseppe’s Flourless Chocolate Cake
Gus isn’t claiming this is his own recipe but he baked this awesome flourless cake and I asked him if I could share the recipe with you. You should have seen my toddler’s eyes when he tasted it.
Gus said it was really easy to make (I think he is too modest) but he has a hot tip for the candied orange peel. Never leave candied orange on the burner and get distracted. It doesn’t end well for the pan nor the hob :).

Steps
- Baking the cake.
- Making the candied orange topping.
Ingredients
- 180g dark chocolate
- 160g unsalted butter
- 200g almond meal
- 150g caster sugar
- 5 eggs
- 1 large orange
- 1/2 cup water
- 1/2 cup raw sugar
Equipment
- 1 bowl to melt the butter and chocolate (or a saucepan)
- 1 bowl for the egg whites
- 1 bowl for the egg yolks
- 2 whisks
- 1 springform cake tin (about 25 -28 cm)
- 1 chopping board
- a peeler or citrus zester
- a long sharp knife
- a small saucepan for the orange peel
Steps:
Baking the cake
- Heat your oven to 160°C.
- Melt the dark chocolate and butter and mix together, set aside.
- Separate the eggs and in one bowl beat whites until firm peaks form.
- Beat yolks & caster sugar until pale & creamy in another bowl.
- Add slightly cooled chocolate mixture to the egg yolk mixture, fold in gently.
- Add almond meal to this mix, fold in.
- Fold in beaten egg whites, in 2 or 3 lots folding in gently. Tip: always add beaten egg whites in small batches, these add air and support the mix as there is no yeast to leaven the mix. You will find the last lot of egg whites will fold in easily and not have all the air swished out.
- Line the base of a springform cake tin with baking paper, grease base and sides with butter.
- Pour mix in and bake for about 40 min. It should be moist inside with a thin crust that will form cracks.
Making the candied orange topping 🍊
- Wash the orange well.
- Using a vegetable peeler, peel orange, try not to take the white pith. Just get the peel.
- On a board cut the peel strips as thin as possible (this is the time consuming part) but they can be as large as you like.
- In a small saucepan mix equal parts of water and sugar, I usually do half cup of each.
- Heat to dissolve sugar and then add the sliced orange peel.
- Allow to boil and then turn heat down to a simmer.
- Allow to simmer gently for about 30-40 min, liquid will evaporate. I usually add a little more water2 or 3 times while simmering.
- When you are happy it’s “candied” enough take off the heat, allow to cool slightly, it will be very hot and I have learned this the hard way from trying to taste the syrup :).
- Place candied peel on cake. You can also pour the remaining syrup over the cake, it will have a nice orange flavour
Enjoy,
😊
Gus
YOU MIGHT ALSO LIKE
MORE VEGETARIAN , GLUTEN-FREE INGREDIENTS AND MEALS
Please consider subscribing to a weekly email summary of our posts or check us out on Facebook @growitcatchitcookit.
[mc4wp_form id=”15771″]
Written by
·
-

KT’s Bush Walker Cookies
My wife has been using this cookie recipe for as long as she can remember. She calls it one of her no fuss recipes. Now we are parents my wife uses less sugar, allegedly but they still come out tasting amazing. My picky toddler never says no to them and he calls them “mummy bi’cuts:” :).
STEPS:
- Combine the cookie ingredients
- Bake and store
You will need:
- Ingredients:
- 0.5 cup butter or margarine
- 1 cup raw sugar
- 1 egg
- 0.5 tsp vanilla essence
- 1 Tbsp water
- 0.5 tsp bicarbonate of soda
- 1 cup of dried fruit (my wife uses raisins and currants)
- 1 cup self-raising flour
- 1 cup rolled oats
- 1 cup of breakfast cereal e.g. Kellogs Cornflakes or Wheaties
- 0.5 cup of desiccated coconut
- Equipment
- a large mixing bowl for the cookie mix
- a small bowl to beat the 1 egg
- a fork or a small whisk
- a non-stick baking tray
- baking paper (optional)
- a fan forced oven
Combine the cookie ingredients
Steps:
- Take the 0.5 cup of margarine (or butter) out of the fridge and let soften for a while.
- Add the margarine to the large mixing bowl and mix in the 1 cup raw sugar.
- Beat the 1 egg, 0.5 tsp vanilla essence, 1 Tbsp water and 0.5 tsp bicarbonate of soda, in the small bowl, with a fork or small whisk.
- Add to the large mixing bowl.
- Mix in the:
- 1 cup of dried fruit
- 1 cup self-raising flour
- 1 cup rolled oats
- 1 cup of breakfast cereal eg Kellogs Cornflakes
- 0.5 cup of desiccated coconut
- Roll the cookie mix into balls, flatten with your hand and place on the oven tray, with or without a sheet of baking paper under them.
Bake and store
Bake the cookies for 20 to 25 minutes in a fan forced oven set to 160°C. When done, place them on a cooling rack.
You will find that the whole family loves them fresh and that they freeze exceptionally well. We use a large snap lock bag in the freezer and pull a few out at a time for the kids’ lunch boxes.

Hope you like them,
PK
Written by
·