Tag: brine
-

Honey Brined Roast Chicken
Brining a chicken before you roast it enhances and locks in flavours and keeps the meat tender and moist. We have some general brining tips here (Ben’s brining tips) and today I am going to be adding honey and cinnamon.

Steps
- Making the brine
- Brining the chicken
- Cooking the chicken
- Serving
Equipment
- 1 chefs knife
- 1 large mixing bowl (big enough to submerge the chicken)
- 1 oven roasting tray
- 1 roasting rack (preferable)
Ingredients
- 1 chicken
- 1 cup of table salt
- 4 Tbsp honey
- 1 sprig of rosemary
- 1 cinnamon stick
- Several pieces of fresh thyme
- Boiling water, to make a salt slurry
- Cold water, to submerse the chicken
Making the brine
- Add the 1 cup of salt and 4 Tbsp of honey to a large mixing bowl.
- Add boiling water to make a slurry, mix until the salt is dissolved.
- Add the cinnamon stick, rosemary and thyme.


Brining the chicken
- Add cold water (so we don’t start cooking the chicken in a hot brine) to the bowl and then submerse the chicken.
- Pop the bowl in the fridge over night or for at least 4 hours.

Cooking the chicken
Pre-heat your oven to 180C. Cook the chicken for ~1 hour.
Note: You can make it hotter for a shorter cook but the meat should be at 75C in the breast.

You can even chuck some spuds in. Go hotter earlier and then reduce to 180C towards the end, checking the temperature of the meat as you finish.

I am gob-smacked every time with the result. 🙂

Serving:
Let the roast rest for about 15 minutes while you make your gravy and serve the sides.
 Enjoy,
PK
Here are some more chicken recipes and roasting posts :
Written by
·
-

Grochow’s BBQ Pulled Pork
Pulled pork is an excellent starting dish for cooks getting into proper barbecuing. The right cuts of meat are reasonably priced, the cooking process is relatively easy (almost foolproof), and the end result is delicious!
Grochow writes:
Below is my most recently used recipe; noting that I’ve never followed one particular recipe so my process is a bit different each time.
Steps:
- Go to a good butcher and buy a nice lump of pork shoulder. For this particular dish I used two pork collar butts weighing ~3 kg each.

- Sprinkle pork with salt and dry brine in fridge overnight (see here for further information on dry brining and other excellent barbecuing tips http://amazingribs.com/).
- After ~24 h, take pork out of fridge and crank BBQ up to ~107°
- I used my GMG Daniel Boone Pellet Grill this time, but have had equally good results in my Dragon Kamado.
- I like to place a full water pan in the BBQ at this stage.
- If you want (I did this time but don’t always), inject the pork with some combination of warm apple juice/dry rub/chicken stock/sugar/Worcestershire sauce/melted butter. See here for some tips on doing this http://amazingribs.com/)
- Rub generously with your favourite homemade or store-bought dry rub (one that does not contain salt, as we’ve already added a good amount during the dry brining process).

- Place pork directly on grill/on a rack (not a pan) in the BBQ.
- When using the Daniel Boone, I also add an A-MAZE-N tube smoker filled with smouldering apple wood pellets at this stage for supplemental smoke.

- Over the first two hours of the cook, spritz the pork every 20/30 minutes with a mixture similar to the injection marinade above. I’m not confident it actually does anything, but smoke adheres to cold/wet surfaces, so in my mind it will enhance the under-bark smoke ring as it wets and cools the surface of the meat.
- This is also why I put the pork in the BBQ cold rather let it rise to room temperature. The flavour will be no different had you not done this, but the smoke ring looks cool.
- Go and do something else for a while. You will have a bit of time before the pork is ready for pulling. For example, these butts took 16 hours…
- That said, don’t cook to time – cook to temperature. The pork is ready for pulling when the internal temperature reaches 88–95° Trial a few temperatures and see what works best for you. I took these off the BBQ when the internal temperature reached ~92°C. The meat should have a nice dark bark and probe like butter.

- Remove the pork and pull apart using forks.

- The rich bark and moist pork tastes pretty good on its own, but I like to drizzle with a homemade vinegar/mustard BBQ sauce
- Serve as you please! (e.g. with a side of homemade coleslaw, in sliders, on pizza, with nachos, etc.). Leftovers freeze well.

Give it a go guys,
Grochow
YOU MIGHT ALSO LIKE
PK’S SLOW COOKER PULLED PORK
MORE PORK
SLOW COOKER RECIPES
Please consider subscribing to a weekly email summary of our posts or check us out on Facebook @growitcatchitcookit.
[mc4wp_form id=”15771″]
Written by
·
-

Ben’s Butterflied Chook
This dish by Ben is one of his favorites and he says you can easily double the recipe so you have leftovers for tomorrow’s lunch :).
He got his friend Louise to road test the recipe recently using these steps:
- So get a butterflied chook from the butcher and brine (see Ben’s Brining Tips for how) the chook overnight.
- Dry the skin with paper towel and leave it in the fridge uncovered for the day.
- Make a rub with:
- 2 x red Chili
- 2 x cloves Garlic
- 1cm sq lump Ginger
- Small bunch Coriander or 1 tsp powder
- 2-3 tbsp Honey
- 1 tbsp mustard
- 1 x Lime juice and the zest of ½ a Lime
- a slug of vegetable oil
- ~1 tsp salt
- Rub the chook about 2 hours before cooking.
- Cook on bbq (charcoal preferred):
- Start with the skin down until it is crispy.
- Then turn bone side down, shut the lid and cook at ~150/180 till cooked.
The preparation stage is what makes this dish so tasty:
After cooking it will look as awesome as Louise’s:

Enjoy everyone and thanks again Lou,
Ben
See more of Ben’s posts here.
Hot Tip: You can recover the chicken bones to make bone meal for your garden.
Written by
·
-
Ben’s Brining Tips
Ben is over-talented at growing plants and raising animals for meat so he had to become an expert in cooking and preserving too :).
Here he writes about brining meat:
The brine I make can be used on all meats, I regularly use it for seafood (particularly fish I intend to smoke), poultry (chicken, turkey) and pork. It’s important that the meat is not over brined, or it will become overly salty.
Also, you might notice that meat (especially chicken) goes darker than normal when cooking. Don’t panic if it looks a bit strange but do check the internal temperature of the meat.
It’s very important to remember that whatever ingredients you use, the meat will be soaking in it and taking it up. So avoid ingredients that have additives or preservatives. In particular, you must use non-iodised salt that does not have an anti-caking agent in it. For best results, i use natural sea salt and raw sugar.
The brine helps the meat to preserve moisture and flavour in the cooking process. You’ll notice for fish that at the end of brining there will be a lot of slime in the water. When cooked, the meat will be more flavoursome, more moist and fall apart easier. The brine does this by affecting the proteins of the meat (I don’t know how). PK said something about tightening them and that breaks them apart.
[word
Making the brine:
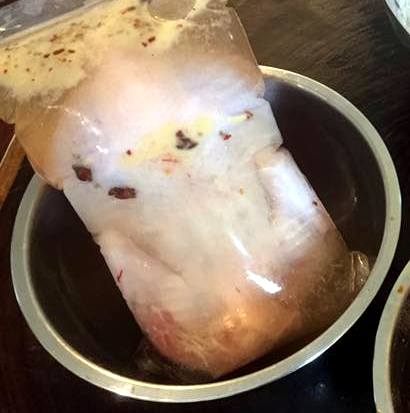
- Put enough water to cover the meat into a bowl. Dissolve salt in the water until a raw potato floats, and then add the same amount of sugar. At this point the brine is done. If you did nothing else you’ve brined your meat! This is where i will stop for seafood, but for other meats, read on.
- Add flavour. There is no end to what you can/can’t add, and no specific quantities. A general guide for poultry is mustard powder (2 tsp), star anise (generally 1 or 2 will suffice), smoked paprika (1 tsp), cayenne (1/2 tsp) and maybe some juniper berries (4-5).
- Put the meat into a bowl or ziplock bag (I prefer the bag), cover with the brine mixture. If you’ve made too much brine, ensure the flavours are transferred (i.e. star anise and juniper berries). Make sure all the cavities are also filled with brine, and there are no air pockets
- Leave in the fridge over night (8-12 hours)
- Take it out of the brine, rinse off and pat dry (make sure you clean the sink down well after).
- Leave in the fridge so the skin dries and goes crispy
- Cook your meat however you like.

Enjoy the brine revolution,
Ben
Related Links:
Please consider subscribing to get a weekly email summary of our posts.
[mc4wp_form id=”15771″]
Written by
·