Tag: thrifty cooking
-

PK’s Dried Citrus Slices
I love preserving food as much as I like growing it (and talking about it). So I did some googling on ways to preserve citrus after my lemon tree decided to try and bury me in fruit :).
My lime tree is a heavy cropper too but in Perth it is not hard to find people willing to take them off your hands :).
Dried citrus can be used for a wide range of things like:
- flavouring jugs/cups of water.
- flavouring your teas.
- adding to smoothies.
- cooking mediterranean and middle-eastern dishes.
- cleaning your kettle of scale (wow).
Simply cut your chosen citrus (I used lemons, limes and oranges) into thin slices.

Pop them on a tray or (my preference) a rack and into an 80C fan-forced oven for 4 to 6 hours. I made sure they were very dry before I took them out and whilst the rind is brittle there is a bit of play in the flesh.
Enjoy,
PK
Written by
·
-

Crumbed Baked Chicken Sticks
As a kid, one of my favourite treat meals was a large serve of Ingham’s Chicken Chippies doused in tomato sauce.
Chicken chippies were chip shaped slices of chicken coated in breadcrumbs and then snap-frozen for retail sale.
The advert was hilarious:
I am not sure if you can still buy them but I now prefer the home made equivalent.
Needless to say, they are very kid friendly 🙂
You will be:
- Prepping the ingredients.
- Dusting and coating the chicken sticks.
- Cooking the chicken sticks.
- Serving.
You will need:
- Ingredients:
- 1 chicken breast (slightly frozen making it easier to cut and shape into sticks)
- 1/2 cup flour
- 1/2 Tbsp ground tumeric
- 1 to 2 eggs (if doubling the recipe you only need 3 eggs)
- ~1 cup Panko breadcrumbs to coat chicken strips
- 1/2 tsp beetroot powder and or ground paprika (optional, just for looks)
- ground black peppercorns to taste
- some spray olive oil
- Equipment:
- a chopping board
- a long sharp knife
- a fork or whisk, to beat the egg
- a mixing bowl
- several plates
- an oven tray lined with baking paper
Prepping the ingredients
- Take a still partially frozen chicken breast and flatten it out some what with your hands.
- Chop breast in to sticks (see how they look like chunky fries).

- In a large mixing bowl mix the 1/2 cup flour, 1/2 Tbsp ground tumeric and the 1/2 tsp beetroot powder (optional, just for looks).

- Whisk the 1 to 2 eggs in a bowl.
- Lay the panko crumbs out on a plate.

Dusting and coating the chicken sticks
- Spray the baking paper lined oven tray with some spray oil.
- Roll each stick in the flour mix, then dip it in the egg and then coat it with panko crumbs.
- Place the finished sticks the baking paper as you go.
- Sprinkle each stick with ground paprika (optional) and ground black peppercorns to taste.
- Give the top of the sticks a light spray with spray oil.
- Pop them into the fridge for 15 minutes or so to set.

Cooking the chicken sticks
Pop the tray into a fan-forced oven (preheated to 200C) for 15 to 20 minutes or until golden brown.

Serving
They really just need your favourite dipping sauce and a salad.

PK
Here are some more chicken recipes and kid friendly meals:
Written by
·
-

Bish’s Basil Pesto Experiment 1
I have two large planter boxes at the edge of our patio that are where I grow my herbs, along with a long thin veggie patch against a fence. Luckily this space is enough for me to play around with some different herbs and veggies.
Giving the long thin veggie patch a bit of a spruce:
Lately we’ve had a surfeit of basil in one of the planter boxes (the other is full of mint) and after some prompting we decided we’d have a go at making pesto.

After picking and washing a heap (and returning a few little spiders back to the patch) we decided we’d try to make a couple of varieties.
The first one we started with basil in a stick blender attachment, and poured in olive oil. It mulched the basil more than anything else, but as we added pine nuts it started to blend down a bit more. Adding some spring onions as a test didn’t help with the mulch-like consistency, though. That wasn’t a great experiment, especially when I didn’t close the blender attachment properly and got it all over myself, the kitchen bench and floor…
The second batch started with four cloves of garlic, and some olive oil. This went into a nice creamy paste quickly, and we added some more pine nuts and then started to add in some basil. This created a much creamier pesto, which went a vibrant light green pretty quickly. Unfortunately, 4 cloves of garlic is a bit much… it’s more like a garlic sauce.
On an earlier trip out that day I’d bought a couple of flip-top seal jars, and after they’d been washed and dried out I loaded up the basil into one each.

I was pretty chuffed with this, but anywhere where there is air (you can see the bubbles) went brown within minutes . I had poured some oil on top to help seal it away from the air but didn’t think about these little air pockets.
A week later we’ve been using the pesto in various dishes (pasta, mainly) but each time we have to scoop out the unsightly brown bits. It’s a bit of a pain, but it doesn’t take away from the taste. The next trick we will try is to blanche the basil and dry it before we turn it into pesto – this should help as the heat will destroy the enzymes that react with oxygen to cause the brown discolouration.
It’s not like we don’t have heaps more basil to test it on, anyway…
Bish
Related Links:
- see more of Bish’s posts here
Please consider subscribing to get a weekly email summary of our posts.
[mc4wp_form id=”15771″]
Written by
·
-

PK’s Baked Mashed Potato, Bacon and Cheese Balls
I normally have enough leftovers for at least one lunch when I cook dinner for my family. So you can imagine how good these potato balls are if I had to buy lunch at work the next day :).
Really easy to make ahead of time and sort of healthy as they are baked and not shallow fried, you and your kids will love them.
Notes:
- Make more than you think you need, they are addictive
- You could work in mashed sweet potato and or pumpkin to get vegetables into picky eaters
- They will need to set in the fridge for a bit before cooking
You will be:
- Prepping the ingredients
- Making the potato balls and rolling in breadcrumbs
- Cooking the potato balls
- Serving them up hot
You will need:
- Ingredients:
- 2 cups cooled mashed potato
- 1/2 cup finely diced vegetables (I used celery and spring onions)
- 1/4 cup of cooled finely chopped crispy bacon
- 1/2 cup of breadcrumbs
- 3/4 cup of grated cheese (I used a mix of Parmigiano-Reggiano and cheddar)
- 1 egg (beaten)
- some spray olive oil
- Equipment:
- a chopping board
- a long sharp knife
- a saucepan for the mashed potatoes
- a potato masher
- a frypan for the bacon
- a fork or whisk to beat the egg
- a mixing bowl
- several plates
- an oven tray lined with baking paper
Prepping the ingredients
- Make your mashed potatoes, aiming for 2 cups worth, and pop it in the fridge to cool.
- Fine chop the bacon to end up with 1/4 cups worth, cook to your liking and then pop them in the fridge too.
- Chop the 1/2 cup of vegetables.
- Grate the 3/4 cup of cheese.
- Beat the single egg.
- Mix the above ingredients in a mixing bowl.
- Put the 1/2 cup of bread crumbs on a plate.


Making the potato balls and rolling in breadcrumbs
- Roll small balls of the potato mix and then roll those in flour.
- Pop them onto an oven tray and then into the fridge to set for at least 15 minutes.
They look pretty yummy already:

Ready for the oven:

Cooking the potato balls
- Give the top of the balls a quick spray with spray olive oil and pop the tray into a fan-forced oven (pre-heated to 200C).
- Cook for about 20 minutes or until golden brown.
Perfection:

Firm on the outside with a lovely soft cheesy texture inside:

Serving them up hot
Perfect with some fresh vegetables, sauerkraut and some dipping sauces (tomato and sour cream mixed with fresh coriander) or in a bowl by themselves as finger food :).

Enjoy,
PK
YOU MIGHT ALSO LIKE
MORE POTATO DISHES
MORE KID FRIENDLY MEALS
Please consider subscribing to a weekly email summary of our posts or check us out on Facebook @growitcatchitcookit.
[mc4wp_form id=”15771″]
Written by
·
-
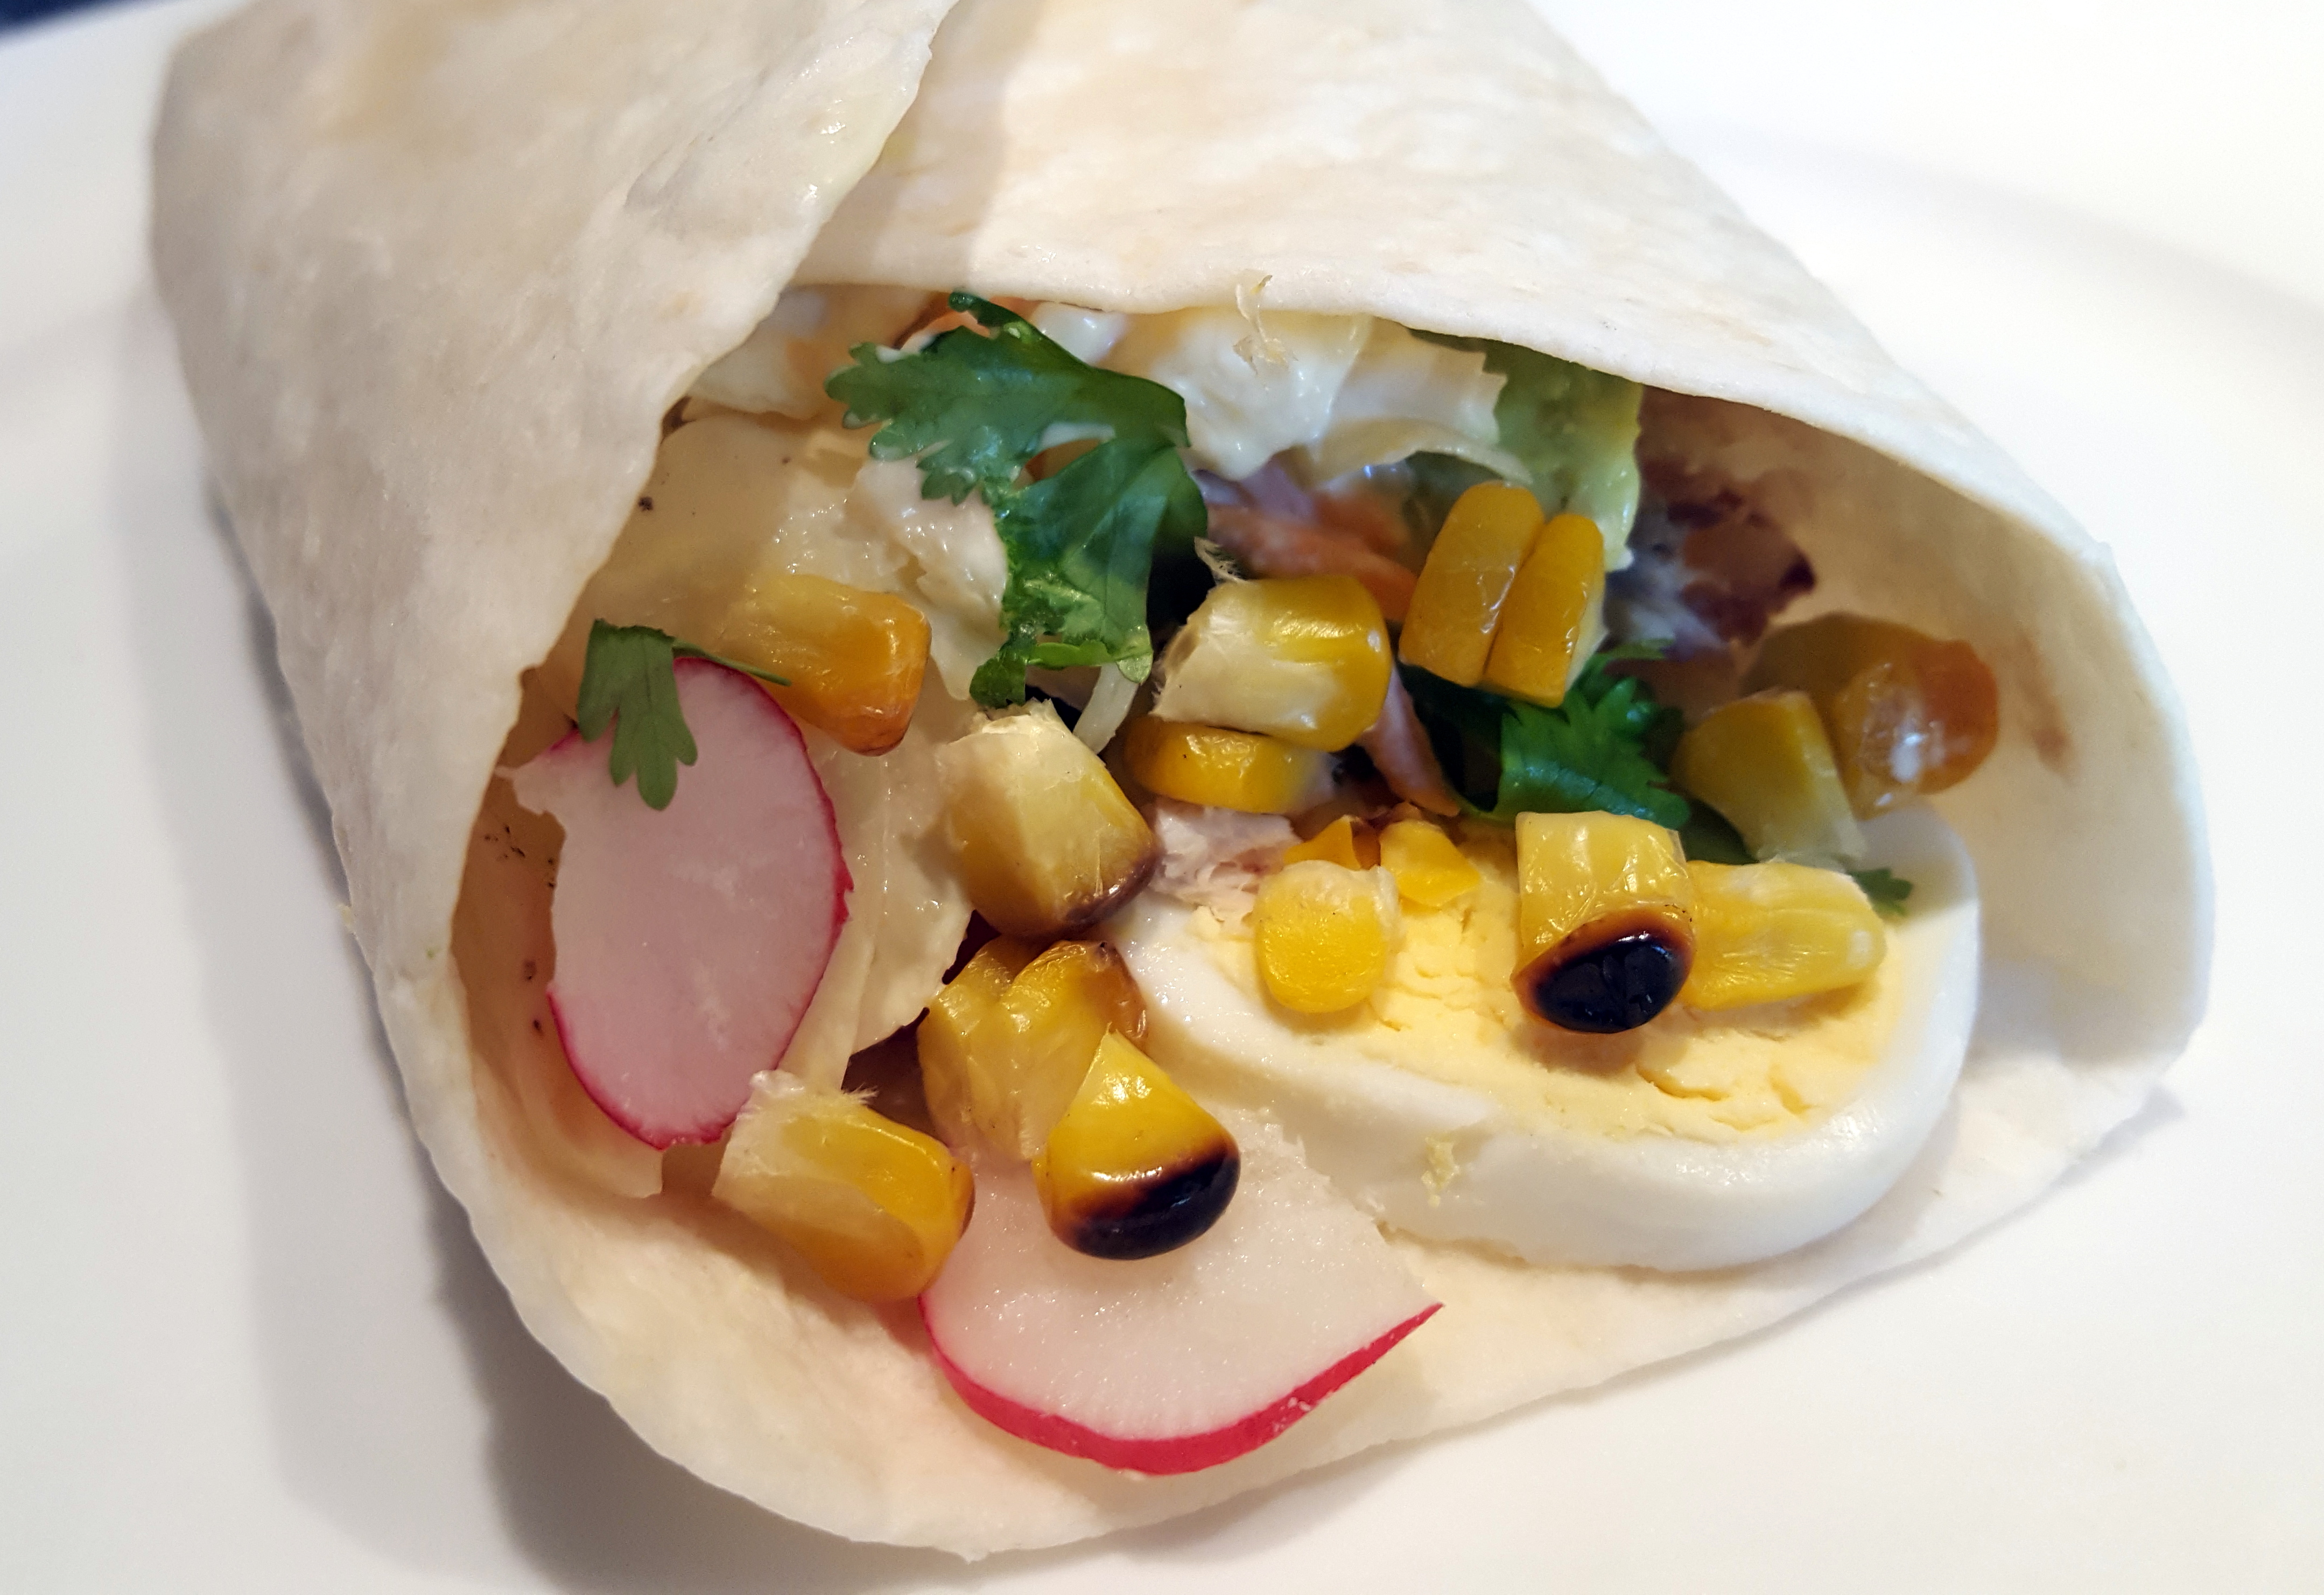
PK’s Thrifty Soft Wraps
My family loves any meal where you prepare fillings in advance and then you build your own meal as you go. I have posted about our tacos, nachos, tasting plates and now……soft wraps :).
Here we have leftover roast chicken, char-grilled corn, boiled eggs, cheddar cheese and coriander plus leafy vegetables from my kitchen garden:

Simply plonk a bit of your chosen fillings mix in the top middle part of a circular soft wrap/tortilla. Then fold the left side over, then the right back over and then fold the bottom of the wrap up.
Here are a few examples:
You get bonus points for:
- using leftovers.
- using produce from the garden.
- visual treats like the char-grilled corn.
- making your own dips or sauces such as a mix of sour creme, coriander and lime juice.
If there is anything left you can make a lunch out of it the next day.
Enjoy,
PK
Written by
·
-

Ben’s Beef Jerky
Beef jerky is a great snack.
Its healthy, flavoursome, and gives you a little burst of energy. I never follow a recipe, so everything is quantity based and taste based. I use a dehydrator to dry the beef, however a light box will be just as good (if not better), it just takes longer.
If I had to roughly write down what I do, this would be it:
- Put into a bowl ~2 tbsp each of Soy sauce and Worcestershire sauce. Add in ~1 tsp malt or brown vinegar, and ~3 tbsp sugar. Mix till dissolved, taste and adjust as necessary until you have a nice flavour.

- Add in any other flavours you like. I will usually add a combination of chilli, smoked paprika, smoke water, coriander seeds (ground), onion or garlic powder.
- Cut ~1 -1.5 kg beef (try to get a topside or silverside) into strips ~1x1cm, as long as you like.
- Trim any fat off.
- Soak the beef in the sauce for 2-3 hours, making sure it is all well mixed.
- Place beef into dehydrator/light box, turn on and leave until you are happy with the toughness of the jerky (I like it tough, so ~24 -36 hours in the dehydrator). Also make sure it is preserved well enough to avoid food poisoning.
Couldn’t be easier,
Ben
Here are some additional Jerky recipes and more from Ben:
Written by
·
- Put into a bowl ~2 tbsp each of Soy sauce and Worcestershire sauce. Add in ~1 tsp malt or brown vinegar, and ~3 tbsp sugar. Mix till dissolved, taste and adjust as necessary until you have a nice flavour.
-

Ben’s Windfall Lime Pickle
This windfall lime pickle is a prime example of preserving your harvests. I encourage you to eat fresh produce during their particular growing season and then their (hopefully made by you) preserved cousins off season. The mass produced commercial versions just don’t compare.
It’s important to use very ripe limes. I use the ones that have fallen from the tree, or are about to, that have a yellowing skin and lots of juice :).
These are the sweetest, using under ripe limes will give you a pickle that is very tart. I wash the limes in a weak vinegar:water solution prior to using, to make sure they are clean and not going to contaminate the pickle (because they have come from the floor and I have dogs).
To sterilise the jars, I put them through the dishwasher and then boil them in a pot of water. If the pickle isn’t ready when the jars are, pop them in the oven (no plastic lids) on very low to keep them hot. You should put hot pickle into hot jars for two reasons. One, because you won’t thermally shock and crack the jars and two because as the jar and mixture cool they will form a vacuum, meaning the pickle lasts longer.
The recipe:
You will need
- 30 limes, washed and diced into ~1cm blocks (skin on)
- 10-20 small chilis, sliced (add to taste)
- 2 tsp turmeric
- 2 tbsp salt (sea salt preferred always)
- 4 tbsp oil (olive or sunflower work best)
- 2 tsp fenugreek
- 2 tsp aniseed or fennel (I use fennel seed)
- 2 tsp garlic seed
- 2 tsp chilli flakes
- ~10 cm ginger grated
- 4 tbsp raw brown sugar
- 2 tbsp vinegar (i use apple cider or brown malt, but also you can use white wine)
Method
- Combine limes, chilli, salt, turmeric into a glass or ceramic bowl, mix and leave at room temperature overnight.
- Heat oil in large pot, add fenugreek, fennel seed, chilli flakes, ginger, garlic powder and cook off to release flavour (2-3 minutes).
- Add lime and chilli mixture, mix well and let it simmer and then turn the heat down for about 20 minutes, or until the lime softens and the mixture thickens.
- Add in the vinegar and sugar, mix well and cook for about 5 minutes. The vinegar acts as a preservative.
- Let the mixture cool slightly, then add to hot, sterilised jars. Seal jars, and place into a cool, dark spot for ~1 month to let the flavour develop.
Cleaning the limes:

Leave the mix overnight:

The finished product (we cracked into it early):


Hope you have more patience than me,
Ben 🙂
Here are some additional preserving food ideas and more from Ben:
Written by
·
-

KT’s Bush Walker Cookies
My wife has been using this cookie recipe for as long as she can remember. She calls it one of her no fuss recipes. Now we are parents my wife uses less sugar, allegedly but they still come out tasting amazing. My picky toddler never says no to them and he calls them “mummy bi’cuts:” :).
STEPS:
- Combine the cookie ingredients
- Bake and store
You will need:
- Ingredients:
- 0.5 cup butter or margarine
- 1 cup raw sugar
- 1 egg
- 0.5 tsp vanilla essence
- 1 Tbsp water
- 0.5 tsp bicarbonate of soda
- 1 cup of dried fruit (my wife uses raisins and currants)
- 1 cup self-raising flour
- 1 cup rolled oats
- 1 cup of breakfast cereal e.g. Kellogs Cornflakes or Wheaties
- 0.5 cup of desiccated coconut
- Equipment
- a large mixing bowl for the cookie mix
- a small bowl to beat the 1 egg
- a fork or a small whisk
- a non-stick baking tray
- baking paper (optional)
- a fan forced oven
Combine the cookie ingredients
Steps:
- Take the 0.5 cup of margarine (or butter) out of the fridge and let soften for a while.
- Add the margarine to the large mixing bowl and mix in the 1 cup raw sugar.
- Beat the 1 egg, 0.5 tsp vanilla essence, 1 Tbsp water and 0.5 tsp bicarbonate of soda, in the small bowl, with a fork or small whisk.
- Add to the large mixing bowl.
- Mix in the:
- 1 cup of dried fruit
- 1 cup self-raising flour
- 1 cup rolled oats
- 1 cup of breakfast cereal eg Kellogs Cornflakes
- 0.5 cup of desiccated coconut
- Roll the cookie mix into balls, flatten with your hand and place on the oven tray, with or without a sheet of baking paper under them.
Bake and store
Bake the cookies for 20 to 25 minutes in a fan forced oven set to 160°C. When done, place them on a cooling rack.
You will find that the whole family loves them fresh and that they freeze exceptionally well. We use a large snap lock bag in the freezer and pull a few out at a time for the kids’ lunch boxes.

Hope you like them,
PK
Written by
·
-

Bish’s Chicken Congee for the Soul
The health benefits of your favourite comfort foods should not be underrated. Traditional recipes especially because they have been handed down from generation to generation for a reason.
Special guest blogger Bish writes:
I’ve been crook most of the week, and as a result I ended up cooking one of my “comfort” foods, congee, or rice porridge.
The thing is, when you are feeling sick, you really don’t feel like doing much, and you sure don’t feel like taking photos of the food you are doing for a potential blog down the road, so PK is going to have to steal some photos from elsewhere to illustrate this post.
Congee is eaten in many parts of the world, and it’s called all sorts of other things in other languages, but in my house (and my mother-in-law’s house) it gets called congee. My mother-in-law and I do bond a bit over cooking and gardening and she’s taught me a few things over the years – like adding dried scallops to my congee while it is cooking.
Anyway, congee has to be one of the simplest dishes to cook and (placebo or whatever) always makes me feel better.
You’ll need:
• Uncooked white rice
• Stock (like Ben’s medicinal chicken broth or PK’s slow cooker chicken stock)
• Other stuff you might want to throw in, like dried scallops
• Condiments – soy sauce, sesame oil, dried shallots and white pepper are my favouritesTo make it:
When I cook up a batch of stock, I freeze it into those takeaway containers that you have lying around, and so there’s always a few of these stored in the freezer – I should label them “in case of illness, make congee with this”. So I’ll start on the assumption that you have some in the freezer…Here we go:
- Take the frozen block of stock out of the freezer, and chuck it in a saucepan on low heat.
- Go take some more cold and flu medications while it defrosts, and turn up the heat a little as you get more liquid.
- When it comes to the boil, chuck in the optional bits you like, and a cup or two of uncooked rice. The amount you put in depends on how much you want to heat, as you’ll probably need to play with the liquid ratios anyway – two cups would do about four big bowls of congee.
- Intermittently come back and take a look at the pot – if it is too dry, add water (or if you have more stock, add more stock), if it is too wet, you can chuck in a bit more rice – but I tend to need to add more water than rice. It’s done when the rice has broken down into a sort of slurry (I know that’s not appetising).
- Turn off the heat and ladle out a bowl full of it. Then you want to finish it off; add in a splash of soy sauce (watch how salty your stock was), a few drops of sesame oil, white pepper and dried shallots. Then go and rug up, and sit and eat it all up. Usually, I then go and have a sleep for an hour or two and then come back, turn the pot back on, warm up the congee, and eat more, then repeat.
- If there’s still some left in the pot that evening, I throw it in the fridge overnight (pot and all) and then have it again for breakfast.
This is not the most amazing recipe in the world or anything, but if you are feeling lousy from a cold or whatever, it’s really easy to make and it does seem to help me get over colds and flus quicker.
I’m going back to bed now.
Bish
Here are more southeast asian inspired cuisine and posts from Bish:
Written by
·
-

KT’s Dippy Eggs and Soldiers
My toddler loves a soft boiled egg and soldiers and when he wants them for breakfast he asks for ‘dippy eggs’. The name has stuck I am happy to say :).
The problem was that I had always cooked hard boiled eggs, using this method, growing up. So I had to ask my wife if she knew how to cook a runny egg. Ironically, even though she only eats poached eggs, she remembered a recipe from BabyMac’s blog (see it here).
I gave it a try and was amazed at the results. Now I cook a couple of eggs for the kids’ brekkie (that is what we call breakfast in Australia) and a sneaky extra one for dad. Add a couple of pieces of toast to make “soldiers” and you are done in under 10 minutes!
We try and source ethically produced eggs with
middling success(we now have a good supplier in Gale Force Farm Organic Free Range Eggs ) but that is a story for another day.STEPS:
- Gather the ingredients
- Boil the eggs and cook the toast
- Serving
You will need:
- Ingredients:
- several slices of toast per person
- one chicken egg per person
- butter, margarine or butter blend for the “soldiers”
- Equipment
- a chopping board
- a butter knife to cut the top off the eggs, butter the toast and cut them into “soldiers”
- a small saucepan
- a toaster
- a timer
- a small plate for the toast
- several egg cups
Gather the ingredients
Steps:
- Put aside a few slices of bread for each person and pop them in the toaster but don’t start toasting them yet.
- Take an egg or two per person out of the fridge and let them start to warm up to room temperature.
- Take the butter out of the fridge.
- Fill a saucepan with water, enough to cover the eggs (one layer deep). Bring it to a rolling boil.
- Set your timer to 5 minutes.
Boil the eggs and cook the toast
Steps:
- I used a slotted spoon to lower the eggs into the boiling water and pressed start on the timer. Be very careful not to put a crack in the shells.
- At 2 minutes left, lower the bread into the toaster. We have our toaster set to make semi-frozen bread into golden brown toast in two minutes.
- At 0 minutes take all of the eggs out off the boiling water.
- Butter the toast and cut into 1.5cm wide strips.
Here is a video of what I think a rolling boil looks like:
Serving
My wife says commit when it comes to taking the top off an egg. Take a butter knife and slice the top part off. It isn’t so much a chopping motion as it is a slow but forceful movement from one side to the other all the way through. Previously I used a teaspoon to crack it all the way around and then scoop off the top but never again. My wife’s way is so much better as you get less broken shell in the yolk :).
A very important note: take the tops off all of the eggs. If you don’t they will continue to cook past the runny egg stage that we are trying to achieve.

Thanks to Beth from BabyMac,
PK
Written by
·