Tag: salt
-

Easy Sesame and Cumin Lamb Chops
This lamb chop recipe is so easy to prepare. All you need are sesame and cumin seeds, a splash of oil and your choice of lamb cut.
Simply take your lamb chops (I like to use forequarter chops) and rub with olive oil. Peanut oil works a treat too.
Then on each side, coat in ground pepper, salt and an equal ratio of sesame seeds and cumin seeds.
Pop them in the fridge the day before if you can.


Then bake, grill or barbeque them.

Enjoy,
PK
Here are some more lamb posts and other simple to prepare meals:
Written by
·
-

Ben’s Butterflied Chook
This dish by Ben is one of his favorites and he says you can easily double the recipe so you have leftovers for tomorrow’s lunch :).
He got his friend Louise to road test the recipe recently using these steps:
- So get a butterflied chook from the butcher and brine (see Ben’s Brining Tips for how) the chook overnight.
- Dry the skin with paper towel and leave it in the fridge uncovered for the day.
- Make a rub with:
- 2 x red Chili
- 2 x cloves Garlic
- 1cm sq lump Ginger
- Small bunch Coriander or 1 tsp powder
- 2-3 tbsp Honey
- 1 tbsp mustard
- 1 x Lime juice and the zest of ½ a Lime
- a slug of vegetable oil
- ~1 tsp salt
- Rub the chook about 2 hours before cooking.
- Cook on bbq (charcoal preferred):
- Start with the skin down until it is crispy.
- Then turn bone side down, shut the lid and cook at ~150/180 till cooked.
The preparation stage is what makes this dish so tasty:
After cooking it will look as awesome as Louise’s:

Enjoy everyone and thanks again Lou,
Ben
See more of Ben’s posts here.
Hot Tip: You can recover the chicken bones to make bone meal for your garden.
Written by
·
-
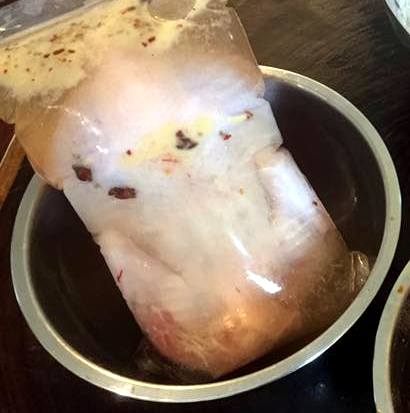
Ben’s Brining Tips
Ben is over-talented at growing plants and raising animals for meat so he had to become an expert in cooking and preserving too :).
Here he writes about brining meat:
The brine I make can be used on all meats, I regularly use it for seafood (particularly fish I intend to smoke), poultry (chicken, turkey) and pork. It’s important that the meat is not over brined, or it will become overly salty.
Also, you might notice that meat (especially chicken) goes darker than normal when cooking. Don’t panic if it looks a bit strange but do check the internal temperature of the meat.
It’s very important to remember that whatever ingredients you use, the meat will be soaking in it and taking it up. So avoid ingredients that have additives or preservatives. In particular, you must use non-iodised salt that does not have an anti-caking agent in it. For best results, i use natural sea salt and raw sugar.
The brine helps the meat to preserve moisture and flavour in the cooking process. You’ll notice for fish that at the end of brining there will be a lot of slime in the water. When cooked, the meat will be more flavoursome, more moist and fall apart easier. The brine does this by affecting the proteins of the meat (I don’t know how). PK said something about tightening them and that breaks them apart.
[word
Making the brine:
- Put enough water to cover the meat into a bowl. Dissolve salt in the water until a raw potato floats, and then add the same amount of sugar. At this point the brine is done. If you did nothing else you’ve brined your meat! This is where i will stop for seafood, but for other meats, read on.
- Add flavour. There is no end to what you can/can’t add, and no specific quantities. A general guide for poultry is mustard powder (2 tsp), star anise (generally 1 or 2 will suffice), smoked paprika (1 tsp), cayenne (1/2 tsp) and maybe some juniper berries (4-5).
- Put the meat into a bowl or ziplock bag (I prefer the bag), cover with the brine mixture. If you’ve made too much brine, ensure the flavours are transferred (i.e. star anise and juniper berries). Make sure all the cavities are also filled with brine, and there are no air pockets
- Leave in the fridge over night (8-12 hours)
- Take it out of the brine, rinse off and pat dry (make sure you clean the sink down well after).
- Leave in the fridge so the skin dries and goes crispy
- Cook your meat however you like.

Enjoy the brine revolution,
Ben
Related Links:
Please consider subscribing to get a weekly email summary of our posts.
[mc4wp_form id=”15771″]
Written by
·
-

Easy Thai Beef Salad
I love southeast asian salads. They are a feast for your eyes and your taste buds. The range of flavours is so diverse, you will never get bored of them.
The key to a good beef salad is a great dressing and a good cut of beef that is thinly sliced and not over cooked. I hope you enjoy making the nam jim dressing and building the salad at the table like my family does. 🙂
Notes: I have shown my timing preferences below for serving the salad with warm beef slices. Of course, if you prefer cold meat in this dish, you can make them in any order and well ahead of time. Oh and don’t forget to bring your steaks out of the fridge a little earlier so they are approaching room temperature as they go in the fry-pan.
STEPS:
- Make the Nam jim dressing
- Roast the rice
- Gather the salad ingredients
- Cook the beef steaks
- Serving Suggestions
You will need:
- Nam jim Ingredients (repeated here for your shopping list):
- 1 tsp powdered kashmiri chilli
- 5 coriander roots (cilantro)
- 3 garlic cloves
- 2.5cm piece fresh ginger root
- 3 Tbsp fish sauce
- 3 Tbsp lime juice
- 1 Tbsp palm sugar
- Roasted Rice Ingredients
- 100g of basmati or jasmine rice
- 1 Tbsp of rock sea salt
- Salad Ingredients
- several large cabbage leaves (1 per person)
- 2 cups baby spinach leaves
- 1 handful of coriander leaves and stems
- 1/2 large red capsicum
- 1/3 of a burpless cucumber
- 1 red shallot
- 1 spring onion
- 6 cherry tomatoes
- 1 cup bean sprouts
- 1 handful of mint leaves
- 1 medium carrot
- 1 handful of snow peas
- your favourite fresh chilis (optional)
- unsalted peanuts to taste (optional)
- Steak Ingredients
- small eye fillet steaks (1 per person)
- ground black pepper to taste
- table salt to taste
- kecap manis or soy sauce (optional)
- Equipment
- an oven tray
- a mortar and pestle
- a chopping board
- a small serving bowl for the roasted rice
- a large salad bowl
- a large frypan
Make the Nam jim dressing

Steps:
- Make the Nam Jim dressing as per PK’s Favourite Nam Jim Dressing.
Roast the rice
Steps:
- Pre-heat your oven to 200° C.
- Spread the rice grains across an oven tray and cook for about 15 minutes or until golden brown.
- Remove them from the oven and allow them to cool.
- Grind 1 Tbsp of rock sea salt in a mortar and pestle.
- Add the cooled roasted rice grains to the mortar and pestle and grind to your desired consistency.
- Add the finished product into a small serving bowl.
Gather the salad ingredients
Steps:
- Wash and dry all of the vegetables.
- Put the cabbage leaves aside, you won’t need them until serving time.
- Keep the 1 cup of bean sprouts aside for the same reason
- To a large salad bowl add:
- 2 cups baby spinach leaves
- 1 handful of hand torn coriander leaves and stems
- 1/2 red capsicum fine sliced (deseeded and pith removed)
- 1/3 of a burpless cucumber sliced and quartered
- 1 shallot fine sliced
- 1 spring onion fine sliced
- 6 halved cherry tomatoes
- 1 handful of hand torn mint leaves
- 1 medium carrot fine sliced (I use a potato peeler to make thin strips)
- 1 handful of hand torn snow peas (chop the ends off each first.
Cook the beef steaks

Steps:
- Preheat your fry-pan and add a splash of olive oil. You could barbecue them outside of course but I prefer a fry-pan when cooking eye fillet steaks.
- Cook the eye fillet steaks to medium rare and allow them to rest, optionally adding a bit of kecap manis or soy sauce at this point.
- Thinly slice the cooked steaks.
Serving Suggestions
Steps:
- Place a whole cabbage leaf on each plate.
- Fill to the brim with the salad ingredients.
- Add the beef slices.
- Throw some bean sprouts over the top.
- Serve along with the roasted rice and Nam jim dressing, sliced fresh chillis and unsalted peanuts.
Enjoy,
PK
Here are more southeast asian inspired cuisine and salad posts:
Written by
·
-
PK’s Thai Beef Salad
I love south east asian salads. They are a feast for your eyes and your taste buds. The range of flavours is diverse and so hard to get right sometimes. The pay off is worth it though and this particular dish is no exception. It is now a family favourite and lends itself well to any communal meal.
I have shown my timing preferences below for serving the salad with warm beef slices. Of course, if you prefer cold meat in this dish, you can make them in any order and well ahead of time. Oh and don’t forget to bring your steaks out of the fridge a little earlier so they are approaching room temperature as they go in the frypan.
STEPS:
- Make the Nam jim dressing
- Roast the rice
- Gather the salad ingredients
- Cook the beef steaks
- Serving Suggestions
You will need:
- Nam jim Ingredients (repeated here for your shopping list):
- 1 tsp powdered kashmiri chilli
- 5 coriander roots (cilantro)
- 3 garlic cloves
- 2.5cm piece fresh ginger root
- 3 Tbsp fish sauce
- 3 Tbsp lime juice
- 1 Tbsp palm sugar
- Roasted Rice Ingredients
- 100g of basmati or jasmine rice
- 1 Tbsp of rock sea salt
- Salad Ingredients
- several large cabbage leaves (1 per person)
- 2 cups baby spinach leaves
- 1 handful of coriander leaves and stems
- 1/2 large red capsicum
- 1/3 of a burpless cucumber
- 1 red shallot
- 1 spring onion
- 6 cherry tomatoes
- 1 cup bean sprouts
- 1 handful of mint leaves
- 1 medium carrot
- 1 handful of snow peas
- your favourite fresh chilis (optional)
- unsalted peanuts to taste (optional)
- Steak Ingredients
- small eye fillet steaks (1 per person)
- ground black pepper to taste
- table salt to taste
- kecap manis or soy sauce (optional)
- Equipment
- an oven tray
- a mortar and pestle
- a chopping board
- a small serving bowl for the roasted rice
- a large salad bowl
- a large frypan
Make the Nam jim dressing
Steps:
- Make the Nam Jim dressing as per PK’s Favourite Nam Jim Dressing.
Roast the rice
Steps:
- Pre-heat your oven to 200° C.
- Spread the rice grains across an oven tray and cook for about 15 minutes or until golden brown.
- Remove them from the oven and allow them to cool.
- Grind 1 Tbsp of rock sea salt in a mortar and pestle.
- Add the cooled roasted rice grains to the mortar and pestle and grind to your desired consistency. I personally like the result to be variably granulated and not fully powdered.
- Add to a small serving bowl.
Gather the salad ingredients
Steps:
- Wash and dry all of the vegetables.
- Put the cabbage leaves aside as you won’t need them until serving time.
- Keep the 1 cup of bean sprouts aside for the same reason
- Slice and then
- To a large salad bowl add:
- 2 cups baby spinach leaves
- 1 handful of hand torn coriander leaves and stems
- 1/2 red capsicum fine sliced (deseeded and pith removed)
- 1/3 of a burpless cucumber sliced and quartered
- 1 shallot fine sliced
- 1 spring onion fine sliced
- 6 halved cherry tomatoes
- 1 handful of hand torn mint leaves
- 1 medium carrot fine sliced (I use a potato peeler to make thin strips)
- 1 handful of hand torn snow peas (chop the ends off each first.
Cook the beef steaks
Steps:
- Preheat your frypan and add a splash of olive oil. You could barbecue them outside of course but I prefer a frypan when cooking eye fillet steaks.
- Cook the eye fillet steaks to medium rare and allow them to rest, optionally adding a bit of kecap manis or soy sauce at this point.
- Thinly slice the cooked steaks.
Serving Suggestions
Steps:
- Place a whole cabbage leaf on each plate.
- Fill to the brim with the salad ingredients.
- Add the beef slices.
- Throw some bean sprouts over the top.
- Serve to the table and let each person add as much or as little of the roasted rice and Nam jim dressing as they like.
- Have sliced fresh chillis and unsalted peanuts on the table for just the same reason.
Enjoy,
PK
Written by
·
-

Kirsty’s Easy Omelette Muffins
Thanks to my good friend and super-mum Kirsty DeRoach (https://www.instagram.com/babyderoach), I now know another great use for vegetables and leftovers that are past their best.
I can add them to the worm farm and compost bins of course or I can give them a second chance in these amazingly good mini quiches.
Not only are they quick to make (everyone will love that especially parents and lazy cooks) but you also get the satisfaction of reducing the amount of food thrown away unused each week.
I haven’t listed any quantities for most of the ingredients as they will vary each time you make them. Experiment and have some fun. Kirsty is right though, mix up the combinations but don’t put too many different ingredients in any given muffin.
STEPS:
- Whisk the eggs and chop the fillings
- Load your muffin trays
- Serving
You will need:
- Ingredients:
- 12 eggs
- any old vegetables at the back of your fridge
- as much bacon or ham as you want
- your favourite cheese
- table salt to taste
- ground black pepper to taste
- Equipment
- a chopping board
- a long sharp knife
- a whisk
- several muffin tins
- a bowl for whisking the eggs
- a frypan if you are adding bacon.
Whisk the eggs and chop the fillings

Steps:
- Give the eggs a good whisk and set aside. Kirsty told me you can add some cream if it needs using up. Add salt and pepper to taste.
- Chop up your vegetables.
- Chop up your ham or cook and chop up your bacon.
- Grate the cheese.
Load your muffin trays
Steps:
- Pre-heat your oven to 180 degrees Celsius.
- Add some of the whisked eggs to the bottom of each hole of the muffin tins. You will have to experiment with how much.
- Add small quantities of your filling combinations to each hole and top each with the grated cheese so that each are about 3/4 full.
- Push most of the floating ingredients under the egg mixture.
- Cook about 10 minutes or until golden brown.
Serving
Once cool enough, pop them out of the muffin trays. They freeze really well but most of ours don’t get to the freezer :).

Thanks Kirsty,
PK
Written by
·
-

PK’s Roasted Apples
Last night I did a roast pork shoulder just to find that I had run out of apple sauce.
I found a recipe where each person gets their very own roasted apple.
I didn’t use their roasting method but I added a couple of small red apples, lightly coated in olive oil and sprinkled with pepper and salt, for the last 30 minutes while I crisped up the roast potatoes.
You know they are done when their skin loses its colour and starts to fall off.
Enjoy,
PK
Written by
·