Tag: raw sugar
-
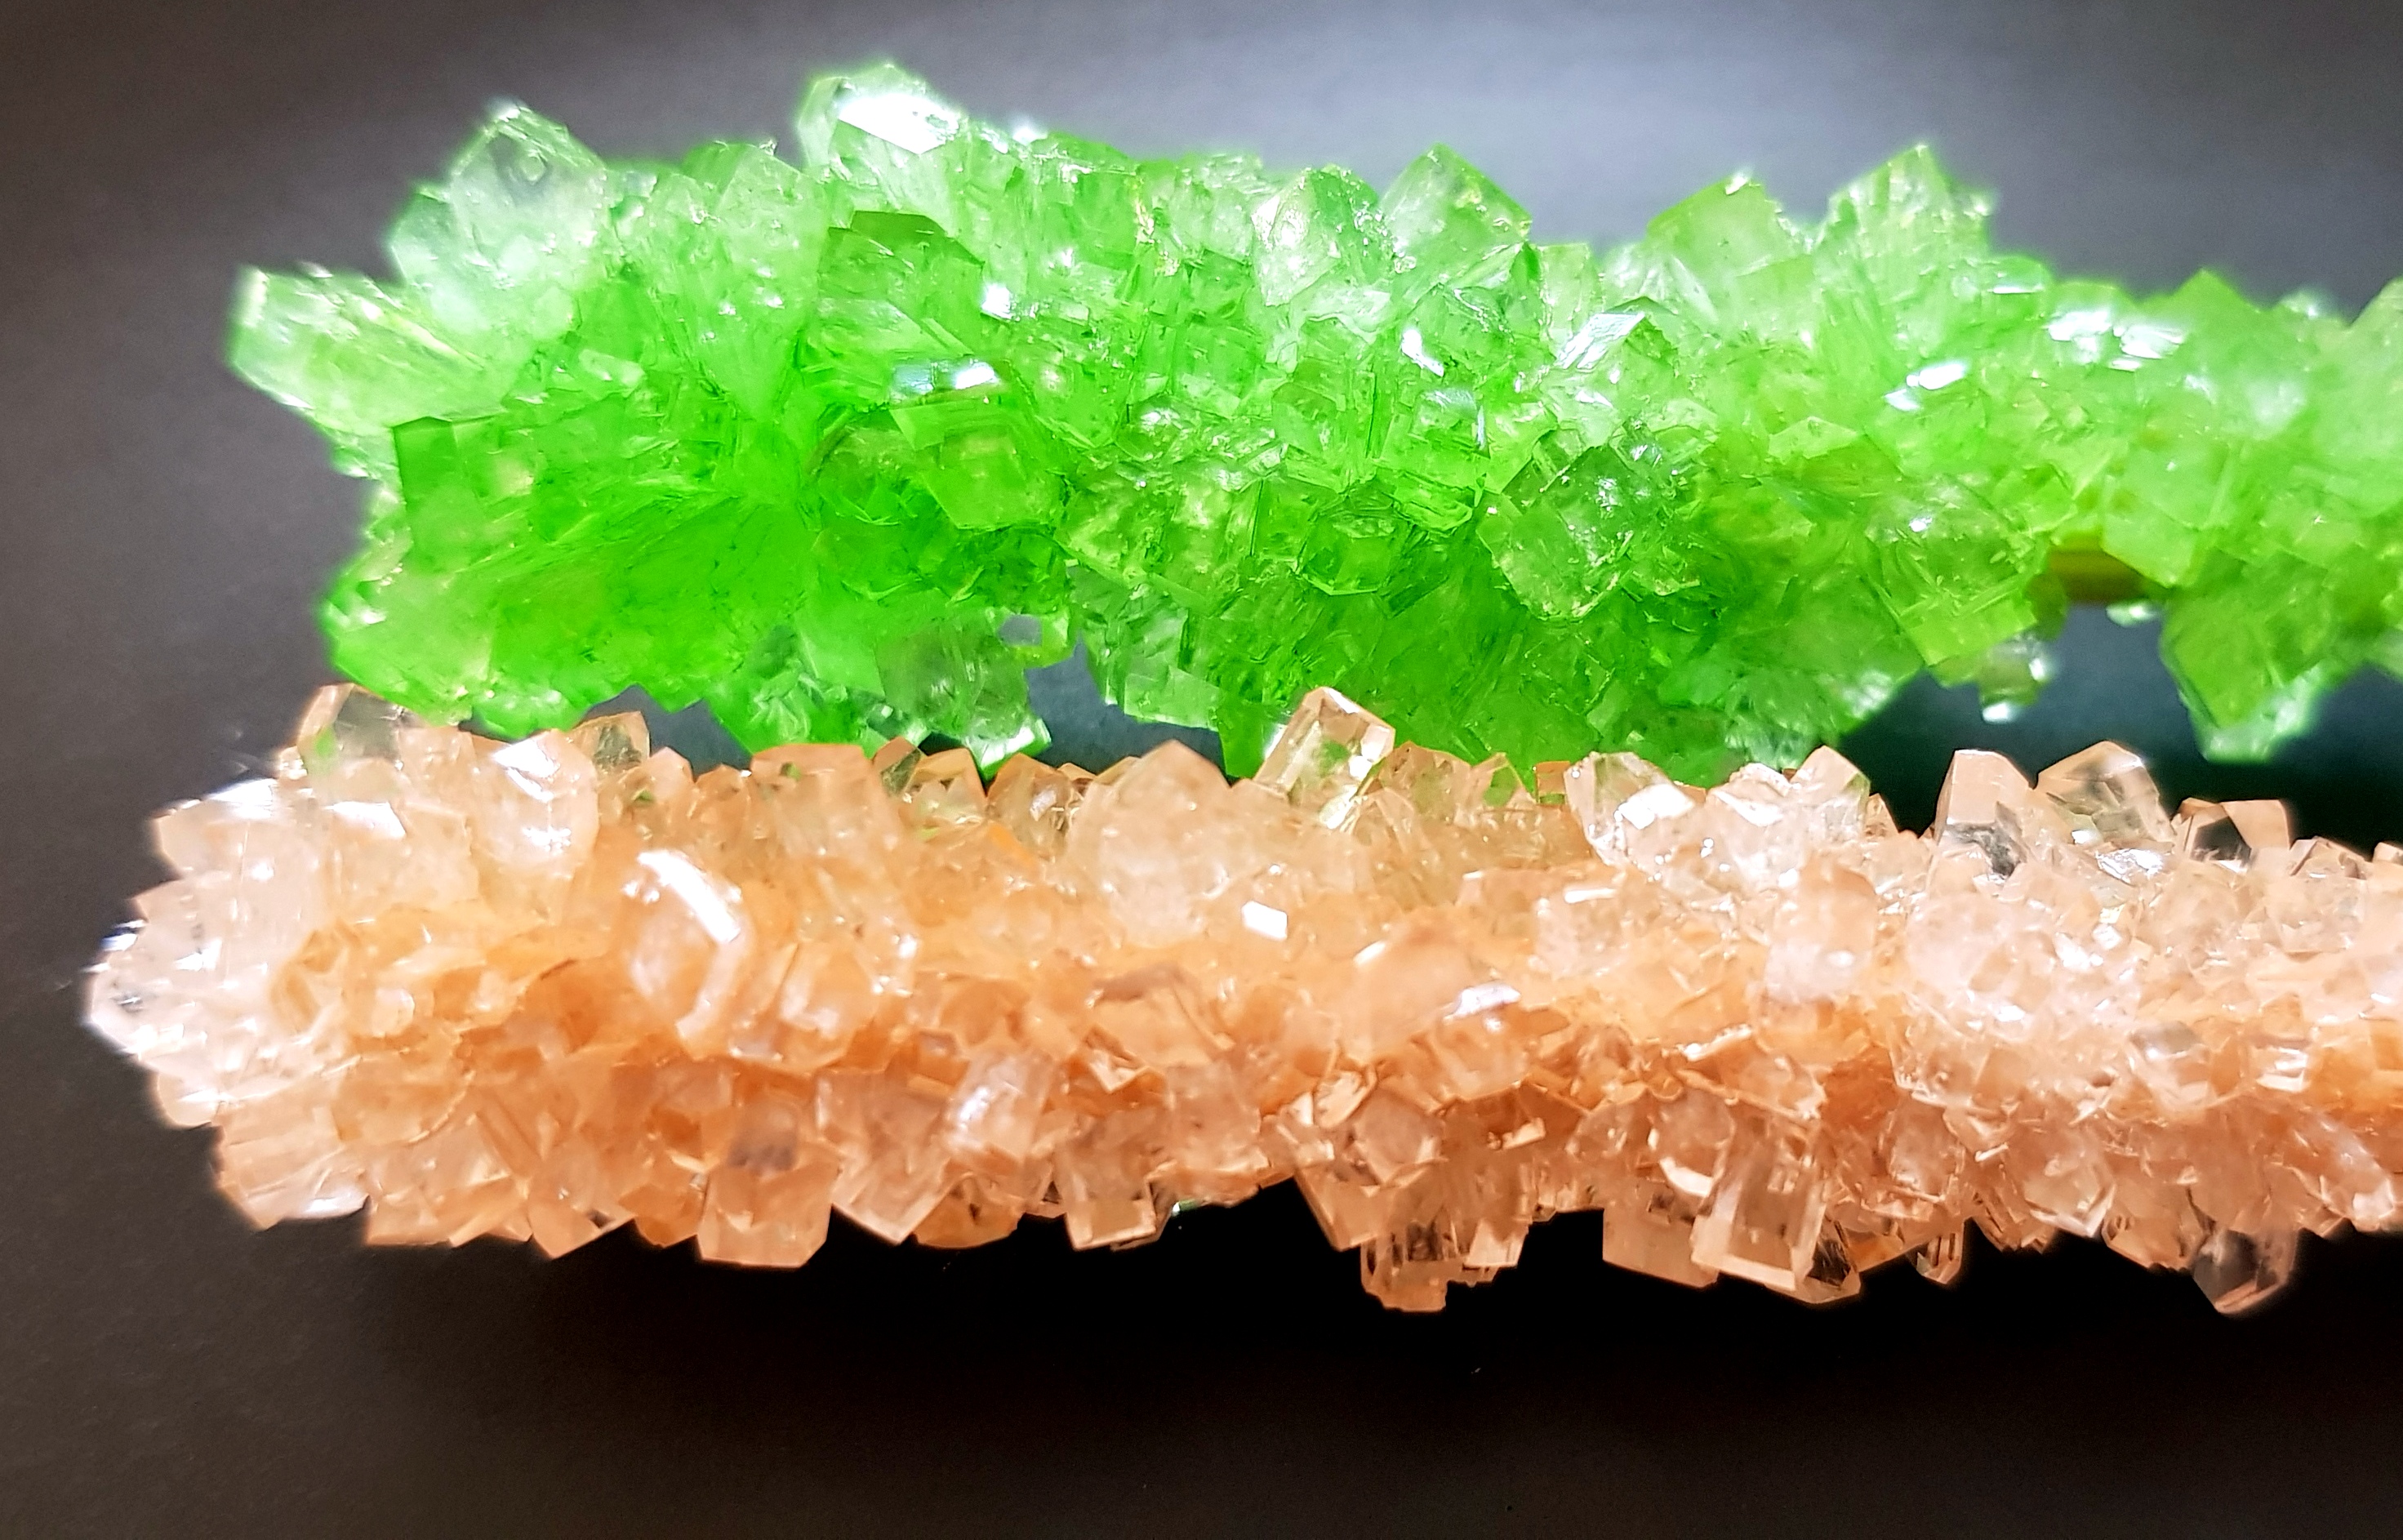
Rock Candy
Making rock candy at home is a lot of fun and even provides you with an opportunity to teach your little helpers a bit of science in the kitchen.
Basically we are dissolving more sugar into boiling water than would dissolve at room temperature. When the sugar water cools the sugar slowly solidifies back out of the solution in crystalised form. The process is called precipitation.
This technique for making rock candy is obviously not mine and there are variations of it all over the internet. The different recipes tend to vary only in the sugar to water ratio and the boiling temperature required.
Boiling the sugar solution
Here I have used a 3:1 raw sugar to water ratio (1 cup of the latter) and I merely boiled the water, slowly at first, until the sugar had dissolved fully. I didn’t try to bring it to a certain temperature and after a few minutes of a rolling boil I took it off the heat. I added food colouring and peppermint oil then simply let the mixture cool.

Crystal time
I then took a bamboo skewer and rolled it in raw sugar, the same tyoe of sugar I dissolved into the water. As the sugar crystals form over the next days and weeks, they will attach to these seed crystals.

I poored the cooled solution into a sterilised jam jar and used a bread clip to keep the skewer in place. It is important that the skewer is kept off the bottom and sides of the jar. We want the crystals to form on the skewer not on the glass. 🙂
I then put the jar in a dry, dark place until the crystals are big enough.
Note: If the crystals don’t start forming in the next few days, you can reboil the solution and add another cup of sugar. Reseed the skewer and it should then work.


The finished candy sticks
They are so amazing to look at. Almost too good to eat!
Store them in a dry place and they will last for ages. Sugar is a natural preservative after all.


I broke up the crystals in my mortar and pestle so I could use them in a Mukhwa. Mukhwa is an Indian mix of fennel and other spices, served after dinner as a breath freshener and digestive.

Enjoy,
PK
YOU MIGHT ALSO LIKE
MOAR SUGAR POSTS
Please consider subscribing to a weekly email summary of our posts or check us out on Facebook @growitcatchitcookit.
[mc4wp_form id=”15771″]
Written by
·
-

Sugar
So what is sugar?
What we commonly call “sugar” is refined sucrose, a carbohydrate of two simple sugars (glucose and fructose) found naturally in plants. Glucose and fructose get a lot of attention in the media because of their central role (for good and bad) in food production and consumption.
Today, refined sugar comes from two plants, the sugar beet (a cultivar of the common beetroot) and sugar cane. There are many types of refined sugar available with the differences being the amount of refinement and added ingredients.
There are also less refined traditional sugar products that have been used to sweeten food for centuries. Our ancestors also used sugar’s antibacterial qualities to keep preserved foods such as jams and the like bacteria free without refrigeration.
Types
Click the links below for more information on different sugars.
Written by
·
-

PK’s NoRecipe Southeast Asian Dipping Sauce
This is my go to sauce if I need to quickly whip up a Southeast Asian style dipping sauce or salad dressing. I use it for rice paper rolls, spring rolls, beef salads, chicken salads and so much more.
Adjust the balance of fish sauce to sugar as you see fit or to suit how you are using it. Put a squirt of Sriracha or sweet chili sauce in there for a bit of a zing :).
Steps:
Simply mix:
- 1 Tbsp fish sauce
- 1 Tbsp peanut oil
- 1 tsp raw sugar
- 1/4 cup lime (or lemon juice depending on purpose)
- sriracha sauce, to taste and optional
Give everything a good whisk to dissolve the sugar and you are done :).


Enjoy,
PK
Related Links:
Written by
·
-
PK’s Southeast Asian Dipping Sauce
This is my go to sauce if I need to quickly whip up a Southeast Asian style dipping sauce or salad dressing. I use it for rice paper rolls, spring rolls, beef salads, chicken salads and so much more.
Adjust the balance of fish sauce to sugar as you see fit or to suit how you are using it. Put a squirt of Sriracha or sweet chili sauce in there for a bit of a zing :).
Steps:
Simply mix:
- 1 Tbsp fish sauce
- 1 Tbsp peanut oil
- 1 tsp raw sugar
- 1/4 cup lime (or lemon juice depending on purpose)
- sriracha sauce, to taste and optional
Give everything a good whisk to dissolve the sugar and you are done :).
Enjoy,
PK
Related Links:
Written by
·
-

PK Cooks Sticky Poached Asian Chicken Thighs
I saw this recipe online here http://www.taste.com.au/ and just had to try it. I also proved along the way that you don’t have to follow recipes exactly to get a great result. I did some steps out of order accidentally and had to rapidly reduce the sauce before everything went south.
Everything worked out well though and I hardly had enough left over for lunch the next day :).
The chicken was so tender and the sticky sauce had an amazing balance of citrus, salt and sugar. I will definitely be making this again but I intend to follow the instructions to the letter.

You will be:
- Preparing your ingredients.
- Poaching the chicken
- Grilling the chicken and reducing the sauce
- Serving.
You will need:
- Ingredients:
- 1kg boneless chicken thighs
- 1 cup chicken stock (see PK’s Slow Cooker Chicken Stock)
- a few slugs of olive oil
- 1 Tbsp fish sauce
- 1/4 cup raw sugar
- 3 garlic cloves, finely diced
- 2cm fresh ginger root, grated (or 1 tsp store bought minced ginger)
- 1 stalk lemongrass, grated
- the rind from 1 lime, finely grated
- 2 Tbsp (or more) lime juice
- Equipment:
- a long sharp knife
- a chopping board
- a grater
- a citrus juicer
- a mixing jug
- a whisk or fork
- an oven dish
- a large strainer
- a medium saucepan
Prepare your ingredients
- Lay the 1kg boneless chicken thighs out in an oven proof dish.
- Peel and dice the 3 garlic cloves, add to the mixing jug along with the 1 cup chicken stock.
- Finely grate the 2cm of ginger and add to the jug.
- Finely grate the 1 lemongrass stem (use the tender parts only and not the thick outer leaves) and add to the jug.
- Grate the rind from a single lime and squeeze 2 Tbsp of lime juice (I used my frozen lime cubes from last season). Add both to the jug.
- Add the 1 Tbsp fish sauce to the jug.
- Add the 1/4 cup of raw sugar to the mixing jug and give everything a good mix (make sure the sugar has dissolved fully).


Poaching the chicken
- Pour the liquid mixture over the chicken and cook for an hour in a fan-foced oven pre-heated to 180C.
- Turn the chicken half way.


Grilling the chicken and reducing the sauce
- Strain the sauce into a saucepan and start reducing it.
- Return the chicken to the oven tray and turn on the grill to brown the chicken.
- When the sauce is very reduced, pour it back onto the chicken a grill for a little bit longer.


Serving
Serve with your favourite rice, some fresh spinach (the heat of the meal will blanch them) or some asian vegetables and a few sprigs of coriander.
Enjoy,
PK
Written by
·
-
PK Cooks Taste.com.au’s Sticky Poached Asian Chicken Thighs
I saw this recipe online here http://www.taste.com.au/ and just had to try it. I also proved along the way that you don’t have to follow recipes exactly to get a great result. I did some steps out of order accidentally and had to rapidly reduce the sauce before everything went south.
Everything worked out well though and I hardly had enough left over for lunch the next day :).
The chicken was so tender and the sticky sauce had an amazing balance of citrus, salt and sugar. I will definitely be making this again but I intend to follow the instructions to the letter.
You will be:
- Preparing your ingredients.
- Poaching the chicken
- Grilling the chicken and reducing the sauce
- Serving.
You will need:
- Ingredients:
- 1kg boneless chicken thighs
- 1 cup chicken stock (see PK’s Slow Cooker Chicken Stock)
- a few slugs of olive oil
- 1 Tbsp fish sauce
- 1/4 cup raw sugar
- 3 garlic cloves, finely diced
- 2cm fresh ginger root, grated (or 1 tsp store bought minced ginger)
- 1 stalk lemongrass, grated
- the rind from 1 lime, finely grated
- 2 Tbsp (or more) lime juice
- Equipment:
- a long sharp knife
- a chopping board
- a grater
- a citrus juicer
- a mixing jug
- a whisk or fork
- an oven dish
- a large strainer
- a medium saucepan
Prepare your ingredients
- Lay the 1kg boneless chicken thighs out in an oven proof dish.
- Peel and dice the 3 garlic cloves, add to the mixing jug along with the 1 cup chicken stock.
- Finely grate the 2cm of ginger and add to the jug.
- Finely grate the 1 lemongrass stem (use the tender parts only and not the thick outer leaves) and add to the jug.
- Grate the rind from a single lime and squeeze 2 Tbsp of lime juice (I used my frozen lime cubes from last season). Add both to the jug.
- Add the 1 Tbsp fish sauce to the jug.
- Add the 1/4 cup of raw sugar to the mixing jug and give everything a good mix (make sure the sugar has dissolved fully).
Poaching the chicken
- Pour the liquid mixture over the chicken and cook for an hour in a fan-foced oven pre-heated to 180C.
- Turn the chicken half way.
Grilling the chicken and reducing the sauce
- Strain the sauce into a saucepan and start reducing it.
- Return the chicken to the oven tray and turn on the grill to brown the chicken.
- When the sauce is very reduced, pour it back onto the chicken a grill for a little bit longer.
Serving
Serve with your favourite rice, some fresh spinach (the heat of the meal will blanch them) or some asian vegetables and a few sprigs of coriander.
Enjoy,
PK
Written by
·
-

Giuseppe’s Flourless Chocolate Cake
Gus isn’t claiming this is his own recipe but he baked this awesome flourless cake and I asked him if I could share the recipe with you. You should have seen my toddler’s eyes when he tasted it.
Gus said it was really easy to make (I think he is too modest) but he has a hot tip for the candied orange peel. Never leave candied orange on the burner and get distracted. It doesn’t end well for the pan nor the hob :).

Steps
- Baking the cake.
- Making the candied orange topping.
Ingredients
- 180g dark chocolate
- 160g unsalted butter
- 200g almond meal
- 150g caster sugar
- 5 eggs
- 1 large orange
- 1/2 cup water
- 1/2 cup raw sugar
Equipment
- 1 bowl to melt the butter and chocolate (or a saucepan)
- 1 bowl for the egg whites
- 1 bowl for the egg yolks
- 2 whisks
- 1 springform cake tin (about 25 -28 cm)
- 1 chopping board
- a peeler or citrus zester
- a long sharp knife
- a small saucepan for the orange peel
Steps:
Baking the cake
- Heat your oven to 160°C.
- Melt the dark chocolate and butter and mix together, set aside.
- Separate the eggs and in one bowl beat whites until firm peaks form.
- Beat yolks & caster sugar until pale & creamy in another bowl.
- Add slightly cooled chocolate mixture to the egg yolk mixture, fold in gently.
- Add almond meal to this mix, fold in.
- Fold in beaten egg whites, in 2 or 3 lots folding in gently. Tip: always add beaten egg whites in small batches, these add air and support the mix as there is no yeast to leaven the mix. You will find the last lot of egg whites will fold in easily and not have all the air swished out.
- Line the base of a springform cake tin with baking paper, grease base and sides with butter.
- Pour mix in and bake for about 40 min. It should be moist inside with a thin crust that will form cracks.
Making the candied orange topping 🍊
- Wash the orange well.
- Using a vegetable peeler, peel orange, try not to take the white pith. Just get the peel.
- On a board cut the peel strips as thin as possible (this is the time consuming part) but they can be as large as you like.
- In a small saucepan mix equal parts of water and sugar, I usually do half cup of each.
- Heat to dissolve sugar and then add the sliced orange peel.
- Allow to boil and then turn heat down to a simmer.
- Allow to simmer gently for about 30-40 min, liquid will evaporate. I usually add a little more water2 or 3 times while simmering.
- When you are happy it’s “candied” enough take off the heat, allow to cool slightly, it will be very hot and I have learned this the hard way from trying to taste the syrup :).
- Place candied peel on cake. You can also pour the remaining syrup over the cake, it will have a nice orange flavour
Enjoy,
😊
Gus
YOU MIGHT ALSO LIKE
MORE VEGETARIAN , GLUTEN-FREE INGREDIENTS AND MEALS
Please consider subscribing to a weekly email summary of our posts or check us out on Facebook @growitcatchitcookit.
[mc4wp_form id=”15771″]
Written by
·
-

PK’s Adults Only Hard Cider
There is a long tradition of making hard cider in European culture. Farms would have a few apple trees of varietals just right for making cider. Go back far enough and you hear stories of agricultural workers either being paid in cider or being allowed to take windfall apples for free to make their own. In England it was more often consumed than wine and aged cider with its vinegary goodness would have packed quite a punch.
I love knowing that what I am drinking is preservative free, gave older or fallen apples a second chance, supported Aussie farmers and reduced food processing and transport costs. However I just learnt that cider isn’t just for drinking.
One of my favourite chefs, Hugh Fearnley-Whittingstall, writes “Cider is fabulous in stews – I adore rabbit cooked with cider and cream, pork in cider is a classic, and lamb works well, too. Once mellowed by long cooking, that fruity flavour mingles beautifully with the richness of the meat – a glassful added to the dish in which you roast a leg of lamb or a chicken will help produce a gorgeous gravy. It’s also fabulous as part of the brining liquid for a home-cured ham.”
I use Granny Smith apples in this recipe (the colour of the fresh juice will blow you away) and although not a popular choice there are commercial breweries that use them. I don’t use any added sugar during the primary fermentation cycle. I also don’t bottle my cider (secondary fermentation cycle) and hence it is non-carbonated when I drink it.
After the yeast has consumed all of the apple sugars they will die and gas will cease to escape the airlock. They will however leave a blanket of carbon dioxide, over the cider, that doesn’t have enough pressure to escape. This gas blanket (plus the alcohol) will stop the cider spoiling while you wait for the flavours to mature. I have heard of people waiting months but the longest I have resisted the temptation to get stuck in is about 4 weeks :).
When I do start drinking it I put the demijohn in the fridge to make sure fermentation has stopped, give it a nice chill and keep it fresh. The airlock and bung get replaced with some plastic wrap.
Note: Please only follow this recipe if you are of a legal age to drink in your country.
You will need:
- Ingredients:
- ~8-10kg Granny Smith apples
- ~6 raisins (to add some wild yeasts to the mix)
- 1 teabag (to add some extra tannins to the mix)
- a sachet of yeast (I use whatever is available, in this case bakers yeast)
- raw sugar to taste (optional and I don’t use any)
- boiling water (to sanitise everything)
- Equipment
- a small bowl
- a fork
- a chopping board
- a long sharp knife
- a teacup
- a juicer (I borrowed a Kuvings cold press juicer from a friend)
- a demijohn (a 4.5 litre glass brewing vessel) with a matching airlock and bung
- a funnel
Steps:
- Pour boiling water into the demijohn and let it stand. Pay particular attention to hygiene here. Make sure everything is clean and including the demijohn’s mouth and outside surfaces.
- Run boiling water through the airlock and soak the bung in boiling water too.
- Add the contents of one sachet of yeast to a small amount of warm water and give it a quick stir. We do this first so that it has time to start multiplying. A few bubbles here and there let you know it is working and it only took the juicing time to be alive and kicking :).
- Make a cup of very weak tea and let it cool while you bust out your juicer.
- Juice the apples and pour the liquid into the demijohn in batches.
- When the demijohn is about two thirds full pour in the yeast mix and add the 6 raisins.
- Swirl the demijohn gently to mix everything.
- Add more apple juice until you are happy with the level.
- Pop on the bung and the airlock.
- Fill the airlock with recently boiled water that you have let cool.
That is it. It should only take a few hours for the airlock to start making a slow but steady bubbling noise. One of my favourite sounds :).
I leave it inside for its first night and then it goes out to the shed. During winter I put it inside an old fleecy jumper to protect against the cold Perth winter nights. I find this is enough to keep the yeast warm and happy.
Hope you enjoy the process and result as much as I do,
PK
Yeast and tea ready:
Juice your apples:
Add the raisins and the cold tea, add the bung and airlock and then add some clean water to the airlock:
Out to the shed:
Written by
·
- Ingredients: