Tag: ben
-

Ben’s NoRecipe Yorkshire Puddings
Yorkies were traditionally served as a first course with gravy, to fill the diner with low-cost ingredients. This would mean that poorer families would make an expensive roast meal stretch further.
My grandparents often talked about having a large Yorkshire pudding to start a traditional Sunday roast.
Nowadays, the yorkie is a staple part of any roast in my house. My wife has the best recipe, and shares it below. Sometimes the simplest things are the best 🙂
Steps:
- Preheat oven to 200°C. Pour 1 tablespoon of oil into six 80ml (1/3 cup) capacity muffin pans. Place in preheated oven for 5 minutes or until oil is hot.
- Combine ¾ cup flour, ½ tsp salt into a bowl. Add 2 eggs and whisk until combined. Gradually add 300 mL milk in a thin steady stream and whisk until smooth.
- Pour batter among the hot muffin pans.
- Bake in oven for 20 minutes or until puffed and golden brown

Ben
Written by
·
-

Ben’s Magic BBQ Sauce
So here is the yummy barbecue sauce that goes with Ben’s Magic Chicken Dry Rub. It is enticingly tangy and smokey and you can use it as a basting sauce or add it to meat and vegetables as you eat. Ben recommends making it in small batches only so it retains its punch :).
All you have to do is add to a pot:
- Two good dollops of tomato sauce.
- A not quite as good dollop of chilli sauce (I use my home-made one, which is a smoky chipotle style).
- A big splash of Worcestershire sauce.
- About 2 Tbsp of brown sugar.
- A small dollop of molasses.
- One drop of liquid smoke.
- Salt or soy sauce to taste.
- A large dash of Ben’s Magic Chicken Dry Rub.
Heat until it boils, is well mixed/dissolved and smelling amazing.

Cheers,
Ben
Related links:
Written by
·
-

Ben’s Magic Chicken Dry Rub
Ben’s latest concoction is a magic dry rub for use on chicken. I tasted the butterflied chicken he used it on (recipe to come) and it was mouth-watering and oh so smokey.
All you have to do is take:
- Equal parts salt, sugar and garlic powder, maybe 2 Tbsp each.
- Smoked paprika (sweet works well too) and chilli to taste.
- A dash of mustard powder.
- A good grind of black pepper.
Combine in a shaker and mix well.
Here is PK using it on some chicken pieces. Don’t turn you your back when cooking with this rub. The sugar can easily burn!

Cheers,
Ben
Here are some more posts bt Ben and chicken recipes :
Written by
·
-

Ben’s Beef Jerky
Beef jerky is a great snack.
Its healthy, flavoursome, and gives you a little burst of energy. I never follow a recipe, so everything is quantity based and taste based. I use a dehydrator to dry the beef, however a light box will be just as good (if not better), it just takes longer.
If I had to roughly write down what I do, this would be it:
- Put into a bowl ~2 tbsp each of Soy sauce and Worcestershire sauce. Add in ~1 tsp malt or brown vinegar, and ~3 tbsp sugar. Mix till dissolved, taste and adjust as necessary until you have a nice flavour.

- Add in any other flavours you like. I will usually add a combination of chilli, smoked paprika, smoke water, coriander seeds (ground), onion or garlic powder.
- Cut ~1 -1.5 kg beef (try to get a topside or silverside) into strips ~1x1cm, as long as you like.
- Trim any fat off.
- Soak the beef in the sauce for 2-3 hours, making sure it is all well mixed.
- Place beef into dehydrator/light box, turn on and leave until you are happy with the toughness of the jerky (I like it tough, so ~24 -36 hours in the dehydrator). Also make sure it is preserved well enough to avoid food poisoning.
Couldn’t be easier,
Ben
Here are some additional Jerky recipes and more from Ben:
Written by
·
- Put into a bowl ~2 tbsp each of Soy sauce and Worcestershire sauce. Add in ~1 tsp malt or brown vinegar, and ~3 tbsp sugar. Mix till dissolved, taste and adjust as necessary until you have a nice flavour.
-

Ben’s Windfall Lime Pickle
This windfall lime pickle is a prime example of preserving your harvests. I encourage you to eat fresh produce during their particular growing season and then their (hopefully made by you) preserved cousins off season. The mass produced commercial versions just don’t compare.
It’s important to use very ripe limes. I use the ones that have fallen from the tree, or are about to, that have a yellowing skin and lots of juice :).
These are the sweetest, using under ripe limes will give you a pickle that is very tart. I wash the limes in a weak vinegar:water solution prior to using, to make sure they are clean and not going to contaminate the pickle (because they have come from the floor and I have dogs).
To sterilise the jars, I put them through the dishwasher and then boil them in a pot of water. If the pickle isn’t ready when the jars are, pop them in the oven (no plastic lids) on very low to keep them hot. You should put hot pickle into hot jars for two reasons. One, because you won’t thermally shock and crack the jars and two because as the jar and mixture cool they will form a vacuum, meaning the pickle lasts longer.
The recipe:
You will need
- 30 limes, washed and diced into ~1cm blocks (skin on)
- 10-20 small chilis, sliced (add to taste)
- 2 tsp turmeric
- 2 tbsp salt (sea salt preferred always)
- 4 tbsp oil (olive or sunflower work best)
- 2 tsp fenugreek
- 2 tsp aniseed or fennel (I use fennel seed)
- 2 tsp garlic seed
- 2 tsp chilli flakes
- ~10 cm ginger grated
- 4 tbsp raw brown sugar
- 2 tbsp vinegar (i use apple cider or brown malt, but also you can use white wine)
Method
- Combine limes, chilli, salt, turmeric into a glass or ceramic bowl, mix and leave at room temperature overnight.
- Heat oil in large pot, add fenugreek, fennel seed, chilli flakes, ginger, garlic powder and cook off to release flavour (2-3 minutes).
- Add lime and chilli mixture, mix well and let it simmer and then turn the heat down for about 20 minutes, or until the lime softens and the mixture thickens.
- Add in the vinegar and sugar, mix well and cook for about 5 minutes. The vinegar acts as a preservative.
- Let the mixture cool slightly, then add to hot, sterilised jars. Seal jars, and place into a cool, dark spot for ~1 month to let the flavour develop.
Cleaning the limes:

Leave the mix overnight:

The finished product (we cracked into it early):


Hope you have more patience than me,
Ben 🙂
Here are some additional preserving food ideas and more from Ben:
Written by
·
-
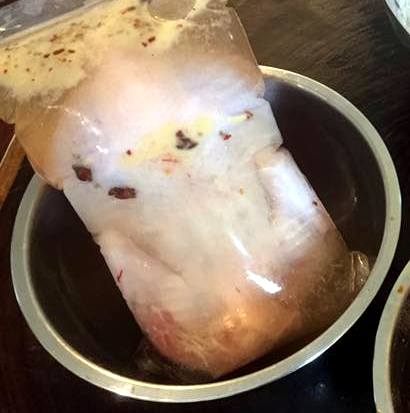
Ben’s Brining Tips
Ben is over-talented at growing plants and raising animals for meat so he had to become an expert in cooking and preserving too :).
Here he writes about brining meat:
The brine I make can be used on all meats, I regularly use it for seafood (particularly fish I intend to smoke), poultry (chicken, turkey) and pork. It’s important that the meat is not over brined, or it will become overly salty.
Also, you might notice that meat (especially chicken) goes darker than normal when cooking. Don’t panic if it looks a bit strange but do check the internal temperature of the meat.
It’s very important to remember that whatever ingredients you use, the meat will be soaking in it and taking it up. So avoid ingredients that have additives or preservatives. In particular, you must use non-iodised salt that does not have an anti-caking agent in it. For best results, i use natural sea salt and raw sugar.
The brine helps the meat to preserve moisture and flavour in the cooking process. You’ll notice for fish that at the end of brining there will be a lot of slime in the water. When cooked, the meat will be more flavoursome, more moist and fall apart easier. The brine does this by affecting the proteins of the meat (I don’t know how). PK said something about tightening them and that breaks them apart.
[word
Making the brine:
- Put enough water to cover the meat into a bowl. Dissolve salt in the water until a raw potato floats, and then add the same amount of sugar. At this point the brine is done. If you did nothing else you’ve brined your meat! This is where i will stop for seafood, but for other meats, read on.
- Add flavour. There is no end to what you can/can’t add, and no specific quantities. A general guide for poultry is mustard powder (2 tsp), star anise (generally 1 or 2 will suffice), smoked paprika (1 tsp), cayenne (1/2 tsp) and maybe some juniper berries (4-5).
- Put the meat into a bowl or ziplock bag (I prefer the bag), cover with the brine mixture. If you’ve made too much brine, ensure the flavours are transferred (i.e. star anise and juniper berries). Make sure all the cavities are also filled with brine, and there are no air pockets
- Leave in the fridge over night (8-12 hours)
- Take it out of the brine, rinse off and pat dry (make sure you clean the sink down well after).
- Leave in the fridge so the skin dries and goes crispy
- Cook your meat however you like.

Enjoy the brine revolution,
Ben
Related Links:
Please consider subscribing to get a weekly email summary of our posts.
[mc4wp_form id=”15771″]
Written by
·