Tag: josh
-
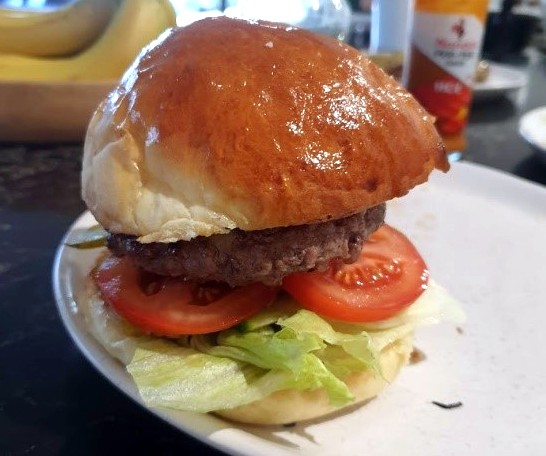
Josh Makes The Best Burger Buns Ever
I use this Joshua Weissman recipe, Japanese techniques and family bread making know how to make the tastiest, lightest burger buns on the planet.
The secret to this recipe is the incorporation of ‘Tangzhong’ (we will making our own below) into the bread dough that gives the bread a fluffy texture.

Helpful tips:
- Don’t use measuring cups for the flour. I have been taught by my partner’s mum that when making bread, to always weigh it out and to do it carefully. No guessing 🙂
- If you want initial success try and follow the recipe exactly as it is written, don’t add extras. The first time I made these buns they were super sticky but that is ok. Leave them sticky and keep to the cooking times below for sure fire success!!
Ingredients
Tangzhong:
- 20g bread flour
- 2 tablespoons (27g) water
- 4 tablespoons (60g) whole milk (not hi-lo etc)
Dough:
- 1/2 cup(120g) whole milk @ 30c – I have got this to about 35 degree’s and still ok. Heat only when at the part of the recipe where it asks for it
- 1 tablespoons (9g) instant yeast
- 320g Bread flour
- 1 teaspoon (7g) fine sea salt
- 2.5 tablespoons (35g) granulated sugar
- 1 whole egg
- 1 egg yolk – Save the egg white and make Meringues (something like “1 egg meringue”)
- 3 tablespoons (42g) unsalted butter, softened
Egg wash:
- 1 whole egg
- splash of whole milk
Step by Step to make the bun’s
Mix the ingredients of the tangzhong. Cook for about 30 seconds on a medium heat (gas cooktop, electric may be different timing). But it should look like porridge. Once its ready, take it out of the saucepan and re-use the sauce pan for the next step.
Using the same pot, heat the milk till it gets to about ~30-35 degree’s. Once it gets to the temperature, remove from heat and add the 9 grams of yeast. Mix together, set a 10 minute timer and set the pan aside.


In the mixing bowl, put the flour, sugar and salt in and combine using a spatula. Put the dough hook on. Put it on a low-medium speed. My Kenwood mixer was set to “2”. Slowly add the tengzhong, milk/yeast and the 1x egg and 1x egg yolk. Move to a “3” or “4” speed on the mixer to a medium speed. Mix until its combined.
SLOWLY add the butter, roughly a 1/3 of it at a time. Keep the mixer going till its well combined and looks smooth.

Wet a clean tea towel (so that its damp) and find a warm place for it to sit for the next 1 to 1.5 hours till its doubled in size. But don’t put it in direct sunlight
Push the mix down and lay it onto a table. Make 6 rolls from the mix.
It will be very sticky, so it will take patience here to get them into a roll shape. It should equate to ~110 grams a roll.
Put them about an inch or so apart, as they rise again, potentially joining together.

Once your happy with the rolls, cover the tray with something like a large baking dish, and move it to warm spot so that they can rise. This will take another 1-1.5 hours

Put the oven on 190 degrees Celsius, about 10 minutes before your bread is finished rising.
Get the egg wash ready and once the rolls are finished rising, brush the entire top of them with the egg wash.

Cook for ~15 minutes or until golden brown.
Serving
I like to make my burger patties out of a special mince from Perth’s very own Gussface Grillah. His mince is fantastic. See https://www.facebook.com/gusfacegrillah/
Roll the gussface mince into 125 gram balls. cook them and assemble your burger how you like it.
Enjoy!!!
Josh
Here is some more from Josh and other baked goodies:
Written by
·
-

Weber Q Baby: Josh Reviews
Weber has been around since the 1950’s and we have seen the shape change ever so slightly over the years, with each new model keeping the “round” kettle shape.
In 2004 a new model (and shape) was released, known as the “Weber Q” Series. A couple of years later, a “Weber Q Baby” was released, and it’s as it sounds, a smaller version of the Weber Q.
Here are the differences – the Baby Q is on the right:

I acquired the Baby Q Q1000 from Myer when they had a special on a few weeks back for $289, normally they are around the $320-$330 price range. The Baby Q was purchased for camping mainly, and events where a small BBQ would come in handy. My old man has a Q2000 (The big guy) and it’s a great BBQ to use, whether it be for smoking meats, or just simply grilling them.
Once it was home it was an easy assembly, you just need a Philips Screw Driver. The new grill and flat plate, being cast iron, was then lightly oiled with Extra Virgin Olive Oil and then with low heat, was left running for 15 minutes, to burn the new BBQ in. Once this was completed, a quick wipe down and it was boxed back up.
If you purchase one of these, based on this or any other review, the Baby Q only comes with the grill on each side, and I would recommend getting the flat plate for the right hand side (around $60) as its definitely worth having a flat plate!
It uses a normal LPG gas bottle, with the POL fitting. BCF sells a 4kg bottle which is more than enough gas for a week away, with it being used for dinner and breakfast.
For those who wish to be prepared, it would be about 30-45mins a day burn time, 5 days total usage and we have about 2kg left of the 4kg of GAS we left with.
A week ago, my partner and I left for Bremer Bay and Albany. A week later and we absolutely LOVE the Baby Q and it’s the perfect size for portability! We cooked multiple types of food, being: bacon, eggs, toast, tomatoes, burgers, steak, corn and chorizo sausage.


Like with any review, there are a few things worth noting that would make the unit better.
I also have a few tips that will help you get the most out of your Baby Q:
- The hose requires a bit of stretching. It took a couple of days cooking to get the LPG hose to the right movability to connect to the gas bottle.
- A hook to hang your cooking utensils on would be welcomed. This is an easy fix by getting the stand. Depending on size of course!
- Get a couple of spare drip tray’s, or have some spare alfoil (aluminum foil) around. We used the alfoil to make a drip tray and it worked just as good as the Weber branded ones.
- Keep the lid down while cooking, there is a lot of heat loss when it’s up. Remember it’s more like a portable oven than a BBQ.
- When you have finished with it, wash it and keep it clean. A well cleaned BBQ is easier to cook with and will produce a better taste. Also ensure a light oil coating is applied before storing it away long team to protect from rust on the Cast Iron.
Would I recommend this?
YES I WOULD 🙂
Josh
Related Links:
Please consider subscribing to get a weekly email summary of our posts.
[mc4wp_form id=”15771″]
Written by
·